Monday, 23 December 2013

Winter Frost Double Pocket Card

I've been making Christmas papercrafts to the very last minute before we head home to see family tomorrow! I plan on sharing each and every one of them when we return!

Amongst all the Christmas cards, I made a special one for my coworker. We are a great team at work and she has become a good friend of mine, so I thought something unique would be most appropriate :)

I chose the double pocket fold for this card. It's quite simple really. I followed this tutorial on youtube and added my own creative touch. I chose the Winter Frost designer paper from Stampin up - this paper is gorgeous! (I've pretty much used all of it up this year!) Bermuday Bay, Coastal Cabana and Smokey Slate have become one of my favourite colour combos! Here's how it turned out:

 
 I finally made use of the chevron punch! I bought it quite some time ago with good intentions to use it... Months later, I pulled it out and have now used it on multiple projects. I love it! I think the rhinestones and the eyelet border really add some detail to this card front. Pull the tag out of the front pocket....
 
 
A simple tag with a little designer paper and adorable sentiment, and of course... rhinestones!
 
Let's take a look inside:
 
 
I simply added little ornaments hanging over the edge of the 2nd pocket. I filled this pocket with a tag from David's Tea filled with White Chocolate Frost tea (sounds delicious!) I pasted a small labels framelit to the space below the pocket so I had a spot to write my message.
 
I love how it turned out! And like I said earlier, this colour combo is fabulous!
 
This will be my last post until 2014! (I hope to be a bit more dedicated to my blog in the new year) :)
 
Merry Christmas and Happy New Year!


Card Ingredients:
Stamps: Tree Trimmings, Four Holidays, Word Play
Paper: Winter Frost DSP, Bermuda Bay, Coastal Cabana, Smokey Slate, Whisper White
Ink: Bermuda Bay, Coastal Cabana
Tools: 1-3/4" Circle Punch, Large Scallop Circle punch, Eyelet Border punch (ret.), Snowflake Punch (ret.), Chevron Border Punch
Accessories: Rhinestones (Michael's), Pool Party Bakers Twine, Silver ribbon


Saturday, 21 December 2013

Very Merry

It's been quite some time since I've posted about my latest papercrafts (sorry about that!). After craft fair season, I start preparing for the upcoming Christmas season. And like every year, Christmas seems to sneak up on me!
But, I always love this time of year - the lights and decorations everywhere, cheery Christmas music, the smell of evergreen Christmas trees, delicious turkey dinners, gift exchanges, time spent with family, and most importantly, celebrating the birth of Jesus. It really is a wonderful time of year!

Today, I want to share with you a Christmas card I made just this past week for a friend of mine:

 
I love how this card came together! I've been wanting to use the Pennant Parade stamp set on a Christmas card, and finally got to making one! The pennants in the stamp set are so versatile! I love that you can use them for either a banner or little trees!
 
After stamping the lined pattern from the Gorgeous Grunge stamp set and placing the trees on the embossed cut-out circle, there was just too much white space (clean and simple just isn't my style!). I created a banner from striped designer paper and placed it in one corner. I then added some linen thread to fill the white space on the bottom half of the card. And finally, I completed it with rhinestones.


Thanks for stopping by!

Card Ingredients:
Stamps: Pennant Parade, Gorgeous Grunge
Paper: Cherry Cobbler, Old Olive, Whisper White, Soft Suede, Season of Style DSP
Ink: Old Olive, Soft Suede, Cherry Cobbler
Tools: Circles nestabilities, Perfect Polka Dots embossing folder
Accessories: Linen thread, rhinestones (Michael's)

Tuesday, 3 December 2013

Craft Fair Finds and Belated Birthday Wishes

Craft fair season is over! It's sad, but also a relief. It's been a good year. Three big craft fairs kept me busy almost every night, making everything from mini albums to punch art gift tags to bookmarks.  Here is a photo of my latest display:

 
My hubby has been a big help with setting up/cleaning up, manning my booth and even demonstrating my pop-up ornaments and mini-albums! I couldn't be more grateful for all the support he gives me during the crazy craft fair season.

Not only do I love to share my crafts at these fairs, I also love walking around and getting to know other vendors. There are so many talented people in Prince George! I always stop to see my fellow vendor, TC Creations. She makes the cutest bibs, burpies, crinklers, and more. I know that when we have kids, she will be one of the first shops I go to for baby stuff!

Another vendor I love to see is Orange U Creative. She is one talented lady! She makes the most beautiful feather headpieces, earrings, necklaces, hairclips... I already own quite a few feather earrings and have asked for a couple more custom orders. Check her out on facebook!  

Every year we see a retired fellow selling wooden birdhouses and birdfeeders. This year we decided to purchase one:

 
I love it! The reason it's displayed in our apartment right now is because we live in a basement suite and really wouldn't get to enjoy watching the birds from our window. So for now it will make a nice house decor piece until we move :)
 
To add to my ornament collection, I bought this cute handmade wooden angel ornament from another vendor:
 
 
How cute is that? I love unique ornaments.
 
I look forward to craft fair season next year, wherever it may be and hope to start preparing much earlier this time around. I will also be spending time updating my Etsy shop in the meantime! Stay tuned! :)
_________________________________________________________
 
Yesterday, my brother-in-law, Eugene, celebrated his 40th birthday! I normally send family members my handmade cards, but this time I thought I would send him something different. My hubby is an awesome photographer, taking photos of landscapes and wildlife mostly. We saw a lot of sheep on our last mini camping trip in Jasper and this one caught our eye...
 
 
So funny! What a perfect picture to put on a card and send to Eugene for his 40th! :)
 
I'm hoping this put a smile on his face :) Happy Birthday Eugene!


Friday, 29 November 2013

Recipe Box

Happy Friday!

One of the many things I will be selling at the craft fair this weekend are recipe boxes. I covered boxes with designer paper from one of my favourite DSP collections in this year's Stampin Up catalogue - Eastern Elegance. I just love the colour combos in this designer paper! 
 
The letters are cut out using my Cricut mini. I don't use this machine often, but when it comes to cutting out letters, it is so handy! I then added rhinestones to give it some sparkle. 

 
I made index cards for inside, using the same colours as the DSP:


Thanks for stopping by!

Recipe Box Ingredients:
Recipe Box - CTMH
Stamps: From the Kitchen Of (ret.)
Paper: Eastern Elegance, Smokey Slate, Coastal Cabana, Whisper White
Ink: Smokey Slate
Tools: 1-1/4" Circle punch, 1-3/8" Circle punch

Thursday, 28 November 2013

More Punch Art Gift Tags

One step closer to Friday... then a busy weekend ahead! I will doing my last craft fair of the year, and this one is usually the biggest! I've been a busy bee this past week!

In yesterday's post, I shared with you a few different punch art characters I made. Here's how I used them on gift tags:


Love how they turned out!

Thanks for stopping by!

Wednesday, 27 November 2013

Punch Art Penguin Gift Tags

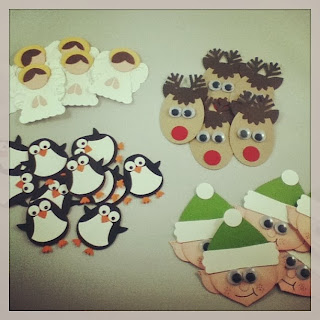
This will be a quick post, as I have limited time before I go off to work this morning! But, I just had to share these cute punch art characters I made last night.

Here's a picture of the 4 different kinds I made:


I can't take credit for coming up with the design of these - I found ideas on Pinterest, but made them somewhat my own by adding googly eyes to some of them and I will be putting them on gift tags.  

Aren't they cute?!

I came across this blog on how to make these penguins using the Owl Builder punch! The ears of the owl were cut off and used as wings, and the nose is simply the small heart in the owl punch - brilliant! It was quite tedious putting all the pieces together, but I love the end product!

Last night, one of the things I worked on was putting these penguins on gift tags. Here's how they turned out:

 
Love these!!
 
Gift Tag Ingredients:
Stamps: Chock Full of Cheer
Paper: Pool Party, Winter Frost DSP, Whisper White, Basic Black, Pumpkin Pie
Ink: Island Indigo
Tools: 1-3/4" Circle punch, Owl Builder punch, Tags Bigz Die
Accessories: Island Indigo bakers twine


Friday, 22 November 2013

High Five for Friday!

Amidst the frigid cold temps and the long work days, there are some good things that happened this week, so I thought it would be fitting to link up with High Five for Friday!

1) I love the latest fashion so I often shop at the mall, however, I've heard you can find some pretty awesome things second hand too! I decided to stop in at Value Village last weekend, since I had a couple hours to kill. And lo and behold I found the perfect pair of American Eagle jeans, just my size and in excellent shape (only thing missing was the button - so thankful I have a wonderful mom who loves to sew!). And the best part?? They were only $6!

2) I recently ordered three new devotional books and they came in this past week. Looking forward to fitting these into my daily routine!

 
3) I'm well on my way to completing my Christmas shopping! Each year both of our families do a family gift exchange, so technically I only have to buy for two people, but I put a lot of effort into my Christmas gifts! So happy I'm nearly halfway done!
 
4) On my shopping trip last weekend, I stopped at one of my favourite stores in the mall - David's Tea - and picked up the latest holiday teas. I love the new Gingerbread flavour!
 

5) Stampin Up has their annual sale extravaganza which started this past Thursday! I love when Stampin Up has promotions! Well, it can be a love-hate situation, since it encourages me to feed my stampin' addiction! :P I ordered a few things for a great deal and can't wait to see them on my doorstep next week!

Monday, 11 November 2013

Craft Fair #2 and a Christmas Card

After MIA for a little over a week, I'm back with a new post!
It was a busy week of evenings filled with preparing for the D.P. Todd Craft Fair, but it was well worth it! The weekend was a great success! This was my first year doing this particular craft fair and I really enjoyed it. There was a great selection of vendors, from woodworking to baby bibs to delicious baked goods! There was a cupcake vendor on one side of my booth and jams and jellies on the other -- sitting next to the cupcakes was especially dangerous! My most favourite was the Salted Mocha Caramel cupcake - yum!

Here's a picture of my booth, much the same set up as the last craft fair:


This week will be another busy one as I keep on crafting for Thursday night's fair: "Ultimate Shopping Experience & Pampering Night". This will be a bit of a different atmosphere than most craft fairs. It's a ladies night, with a more interactive shopping experience - looking forward to it!

-----------------

I thought I would start sharing some Christmas cards I've been working on lately, since Christmas will be here before we know it!

Here is my latest and one of my favourites:

 
I used Early Espresso Co'ordinations cardstock for the card front. I love the distressed look it gives when it is embossed. The stamped image is from "Welcome Christmas", a retired stamp set that I snagged when it was on clearance (bonus!). I love this stamp set. The images are so adorable! My favourite part of this card is the Cherry Cobbler striped ribbon with the jingle bells and tags tied to it. The jingle bells add the perfect touch!


Thanks for looking! Hope this inspires you to get an early start on your Christmas cards! :)
 
Card Ingredients:
Stamps: Welcome Christmas (ret.); Tiny Tags
Paper: Cherry Cobbler, Very Vanilla, Early Espresso co'ordinations
Ink: Early Espresso, Cherry Cobbler
Tools: Jewelry Tag punch, Vintage Wallpaper embossing folder
Accessories: Cherry Cobbler striped grosgrain ribbon (ret.), linen thread, jingle bells (Michael's)


Friday, 1 November 2013

High Five for Friday

Happy Friday!

Can't believe it's already November!

This week has been a long week, but there have been some highlights!

1.
I'm getting a good stock going for the upcoming craft fairs. These ornaments pop open to make a star. They were a big hit at the last fair!
 

2.
I already shared this with you yesterday, but it definitely was one of the highlights this week. Carving pumpkins is probably my most favourite part of Halloween!
 
3.
 My Stampin Up order came in yesterday (yay!). I stocked up on paper mostly, but also got these fun stamp sets that were 25% off (bonus!). Can't wait to try them out!
 

4.
 We had some fun dressing up Keta with a halo headband for Halloween (ok, maybe we had too much fun). Poor girl! She did not like that thing on her head! She crawled up on my lap and looked at us like "why do I have to wear this thing?"
 

5.
 Ok, so this isn't the best photo... but I tried! There were fireworks just a short walk from our house for Halloween! They were awesome! We didn't get to enjoy them for too long as Keta got pretty terrified from them, but it was neat to see! I never thought Halloween would be the holiday to have fireworks, but I love it!
 
 
Linking up with Lauren Elizabeth for H54F!


Thursday, 31 October 2013

Pumpkin Carvings and Birthday Wishes

While Halloween isn't my most favourite holiday of the year (it was more fun as a kid!), I still love getting in the spirit by carving pumpkins! Each year I try to do something different and unique. Here is a series of pumpkin carving pictures from the past couple years:

My hubby's masterpiece, Halloween 2011
 
My pumpkin carving, Halloween 2011
 
Halloween 2012 (mine is the maple leaf)
 
And finally, my latest carving:


Hope you all have a safe and Happy Halloween! I look forward to seeing all the kids in their costumes tonight!
 
--------------------------------------------------------------------------------------------------
 
On another note, it is my niece's 3rd birthday today!
 
I pulled out one of my older designs (and one of my favourites!) and thought it would be perfect for sweet Janna:
 
 
This cute little deer comes from a retired Stampin Up set called Forest Friends (one of my favourites). I paired it with wildflower designer paper and added a paper flower with a brad in the center, sponging the edges with Rose Red ink. I thought the sentiment was a perfect choice to go along with the deer. Did you notice the play on words? :)


Here's wishing Janna a fun day filled with sunshine, laughter, hugs and kisses! 

Card Ingredients:
Stamps: Forest Friends (ret.), Happiest Birthday Wishes
Paper: Pink Pirouette, Chocolate Chip, Whisper White, Always Artichoke, flower DSP (Michael's)
Ink: Chocolate Chip, Rose Red
Tools: Circles Nestabilities, Scallop Trim Border Punch
Accessories: Paper flower, brad, rhinestones

Wednesday, 30 October 2013

Birthday Wishes for Mo!

Today, birthday wishes go out to my goofy, sweet, handsome nephew, Moses!

 
This is a younger picture of Moses - doesn't he have the sweetest smile?!
He has grown up quite a bit since this picture was taken. I look forward to seeing him again this Christmas!

Because he loves cars and trucks so much, I thought it would be fun to make him a card with a race car on it!

 
I fussy-cut the race car and popped it up using dimensionals. I love how the red polka dot designer paper brightens up the card and makes the sentiment and race car stand out.


Here's wishing Moses the best day!
 
Card Ingredients:
Stamps: Fast and Furious (CTMH)
Paper: Night of Navy, Smokey Slate, Basic Gray, Whisper White, Polka Dot Parade DSP
Ink: Black Staz-On
Tools: Circles nestabilities

Tuesday, 29 October 2013

Halloween Themed Challenge - Card #2

Halloween cards are so fun to make! I'm entering another card in the Simon Says Stamp Wednesday Challenge:

HALLOWEEN  or HALLOWEEN COLOURS
 
 
I used layers of designer paper from the 'Witches Brew 'collection to create the card front. The Trick or Treat stamped image is popped up and bordered with a Decorative Label. Candy dots embellish the card (my new favourite embellishment!)


Thanks for stopping by!
 
Card Ingredients:
Stamps: Trick or Treat (Michael's)
Paper: Pumpkin Pie, Very Vanilla, Basic Black, Witches Brew DSP
Ink: Staz-On Black
Tools: Decorative Label punch
Accessories: Pumpkin Pie candy dots


Monday, 28 October 2013

Halloween Themed Challenge - Card #1

It was nice to have a relaxing weekend after a fun, crazy busy week! After getting the house cleaned up and organized last Monday, we had an unexpected visit from family for a few days! Our brother & sister-in-law and their two kids thought they would take a detour up to Prince George. It was so good to see them! We had a great time - short, but sweet :) My hubby and I then went on a date night to see Great Big Sea in concert! What an awesome show it was!
I then took advantage of this past weekend to catch up on some much needed sleep and get my craft on! (only two weeks till the next craft fair!)

Since Halloween is quickly approaching, I thought I would play along with the Simon Says Stamp Wednesday Challenge:
 
HALLOWEEN  or HALLOWEEN COLOURS
 

For this card, I pulled out my favourite Halloween stamp set -- Googly Ghouls (can't get enough of these cute characters!). I love using Pumpkin Pie and Basic Black for Halloween and was happy to see that this orange was in the new "Witches Brew" DSP from Stampin Up!


Black striped ribbon wraps around the card front. The mummy and sentiment are cut out free-hand and popped up to give the card some dimension. I added googly eyes to both characters to complete the card.


Thanks for stopping by! I hope to share another Halloween card tomorrow!
 
Card Ingredients:
Stamps: Googly Ghouls, Teeny Tiny Wishes
Paper: Pumpkin Pie, Basic Black, Very Vanilla, Witches Brew DSP
Ink: Staz-On Black
Tools: Circles Nestabilities, Scallop Circles Nestabilities
Accessories: Black Grosgrain Ribbon, googly eyes

Monday, 21 October 2013

Craft Fair Highlights and Birthday Wishes for an X-box Lover

What a weekend! It definitely flew by! I had a booth at the local Artisans of the North Fair at the University of Northern BC for the weekend and it was a blast! My booth was all set up in the nick of time Saturday morning and swarms of people dropped by off and on throughout the weekend. I'm so grateful for all those who took interest in my paper creations!  It was a great success and I look forward to the next one! (Only three weeks to prepare!)

Here is a picture of my booth:


---------------------------------------------------------------------------------------------------------------
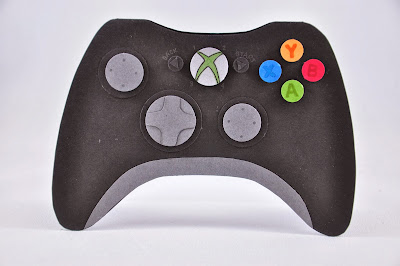
On another note, today is my brother-in-law's birthday! Each year I try to think of something unique for each family member's birthday, something related to their interests/hobbies or professions. Well, this particular brother loves to play X-box. I honestly have never met someone who loves it that much! So, to go along with his interest of video games, I thought it would be fun to make a card in the shape of a controller. I found a template for the base of the card online (unfortunately, I can't find the original blog post), but modified it slightly. I had my hubby's controller in front of me to try and make the card resemble the controller as closely as possible. Here's how it turned out:

The controller:

 
And the card:


I think it turned out quite well! I popped up each circle to resemble the buttons on the controller and used markers for the letters and x-box symbol.
 
Here's wishing Jonathan a very Happy Birthday!