Friday 28 June 2013

Thank You Cards for Teachers

Happy Friday!

This week has flown by! Work has been so busy since I got back from vacation, but I love it! I'm looking forward to a relaxing long weekend though with beautiful HOT weather (up to 35 deg C next week!). We recently purchased a 5-person oasis island float and hope to try it out on Canada Day on a nearby lake. Should be fun!

For today's post, I wanted to share with you 6 thank you cards that I made for a friend. Her kids give gifts/cards to their teachers on the last day of school and she requested some handmade thank you cards for them to hand out - one for a librarian teacher, one for each of their teachers, one for their music teacher, one for the principal, and one for the secretary.
This was a fun challenge! I had some ideas in mind for the teachers, but struggled a bit with the card design for the principal and secretary. However, I'm really happy with the results!

Here's what I came up with:


A bookworm for the librarian
 

For teacher #1
 

For teacher #2
 
For the music teacher
 
For the principal

For the secretary

It was so much fun to come up with 6 different designs. I especially love that owl on the 2nd card above!
 
Thanks for visiting! I will be taking the long weekend off from blogging. Come back on Tuesday for a new post!

Thursday 27 June 2013

A Belated Father's Day Card

I wanted to share with you a father's day card I made for my father-in-law. (I would have also liked to share the card I made for my dad, but unfortunately, I forgot to take a picture of it before I sent it to him!). Ok, so I'm a couple weeks late, but better late than never, right? :)

This card is probably one of my favourites. I'm starting to use the collage technique in a lot of my card designs. As you already know I love lots of layers and embellishments. Just add some distressing, embossing and stamped images and you have a collage card!


I used a new Stampin Up hostess set that I was able to pre-order and I absolutely love it! It's called Simply Sketched. My father-in-law loves nature, wildlife and bird watching so I thought this card would be perfect for him! I created a birds nest from hemp twine and used pearls for the eggs. The edges of the card front are distressed and sponged with Crumb Cake ink. The burlap ribbon and the wood-embossed cardstock add to the collage design. I stamped "happy father's day" and popped them up to give the card some dimension.


Thanks for stopping by!
 
Card Ingredients:
Stamps: Simply Sketched, Teeny Tiny Wishes, French Foliage
Paper: Crumb Cake, Very Vanilla, Soft Suede
Ink: Soft Suede
Tools: Frame Embossing Folder, Woodgrain Embossing Folder, Distress Tool
Accessories: Burlap Ribbon (CTMH), hemp twine, pearls (Michael's), Linen Thread 


Wednesday 26 June 2013

Happy Birthday to my Brother!

Today is my older brother, Tim's birthday! Unfortunately, I don't get to see him often as he lives in Uganda, Africa. Tim and his wife, Angie, are leaders of a missionary team there. They do such wonderful work and have made such an impact on many of the people. But, I miss him! Growing up together, I was quite close with Tim. And when Tim married Angie, me and my younger sister developed quite a bond with them! We would often visit them in Grand Rapids, Michigan and have the best time! It's been hard to keep that bond from a distance, but I think of them often and hope one day we can all live closer together again.

I created a fun punch art card for Tim. He loves Reese's Pieces, so here's what I came up with:


I simply used a scallop punch and punched it twice to create the spiked edges. I used a circle punch for the centre, but had to shape it by cutting free-hand. I used the Owl punch for the small crumbs and that's all there's to it! I think it somewhat resembles a Reese's Pieces, what do you think? :)


Here's wishing him a great day!
 

Card Ingredients:

Stamps: Loved Ones
Paper: Crumb Cake, Chocolate Chip, Very Vanilla
Ink: Chocolate Chip
Tools: Scallop Circle Nestabilities, Circle Nestabilities, Scallop Punch, 1-3/8" Circle Punch, Owl Builder Punch

Tuesday 25 June 2013

Stampin Up in Utah!

One of the highlights on my road trip was being able to stop at the Stampin Up corporate facility in Riverton, Utah (close to Salt Lake City)!! It was so neat to be there! I was given a brief tour of the facility -- it's so beautiful inside! I imagined myself working there and how fun it would be to turn what I love to do into a job!

Here are a few pictures of inside the facility:


And a picture of the warehouse:
 
 
This is where they package and distribute all of the Stampin Up orders. I learned that they don't actually manufacture the stamps at this facility (they are manufactured at a facility 4 hours south of Riverton). This offers a place for all the designers and office staff. Someday I'd love to see how the stamps are made!


Here I am leafing through the new Stampin Up catalogue, obviously super excited to be there! (to see an online version of the new 2013-2014 catalogue, click on the picture in the right-hand column on my blog -->)

 
There were so many beautiful displays! Here are the places where they take photos for the catalogues:


And one of the best highlights of all, I ran into Shelli Gardner, the cofounder and CEO of Stampin Up! I happened to be looking at one of the displays, when she walked by me. I knew I recognized her from pictures in the catalogue, etc. and simply asked "Are you Shelli?" I was shocked and excited at the same time!  She is such a sweet lady and looks very artistic. I was ecstatic to be able to meet her in person!


I got one last picture in the front of the building:


What a fun experience it was! It totally made my day!

Monday 24 June 2013

FMS #91 {A Thank You Card for a Music Teacher}

It's back to work today! It was nice to have some R&R this past weekend (almost need a vacation from our vacation!). And to top it off, the weather in PG was perfect! Lots of sunshine and hot temps! I spent most of the weekend in the sun, in between laundry loads :)

Today is a special day for my father-in-law. We celebrate his 64th birthday! Because we were away, I didn't have a chance to make him a card, but we did send him a postcard from Yellowstone National Park with an image of Old Faithful Geyser on the front. We are thinking of him and send him our best wishes!

When I got back, I was asked to make several thank you cards for school teachers/principal/secretary. This was a fun challenge! It's still a work in progress but I'm happy with the results so far! One of the cards is for a male music teacher. Right away I thought of the Natural Composition designer paper. There is a sheet with embossed musical notes on it - perfect! I used the simple sketch from Freshly Made Sketches this week and am entering it in this challenge just in the nick of time!
 
I had a bit of a challenge with choosing a colour combo, but it came together nicely! The musical note DSP is sponged with Soft Suede ink to make the embossed images stand out a bit more. I added a strip of Midnight Muse cardstock and distressed the edges. Linen thread and a Pool Party button are added to embellish the card. Finally I added flags, one stamped with the sentiment "thank you".


What do you think? It's very clean and simple, not my usual style, but I think it works as a great masculine card!
 
Card Ingredients:
Stamps: Made for You
Paper: Soft Suede, Very Vanilla, Midnight Muse, Pool Party, Natural Composition DSP
Ink: Soft Suede
Tools: Distress Tool
Accessories: Linen Thread, Pool Party button, Pool Party bakers twine


Saturday 22 June 2013

1st Birthday Wishes!

Finally home after an awesome road trip! We did a lot of driving, but got to see SO many amazing sights! God's creation is awesome! We have a couple thousand pictures to sort through and I hope to share with you sometime this coming week!

Feels great to be back into blogging again and hope to start papercrafting this weekend. I miss it!

Today is a special day. We celebrate my niece's first birthday! She is one of the cutest, happiest little girls I know. Unfortunately, I don't get to see her often, as she lives in Uganda, Africa with her family, but my thoughts are with her and I'm sending virtual birthday hugs and kisses her way!


The first picture above is of me meeting Eliana for the first time. The 2nd picture is of Eliana wearing the dress I bought for her birthday (it arrived a month early!). I think it looks adorable on her! She is such a blessing to our family!

Along with the dress, I also made this card for her:


I used an older sketch from Sweet Sunday Sketches as a guide for this layout.

 
I changed it up a bit, but it closely resembles the sketch, I think. I chose Pink Pirouette and Melon Mambo as my main colours. The "happy birthday cupcake" stamp from Patterned Occasions was the perfect image for a 1 year old birthday card! I added a foam sticker number 1 as an added embellishment. Melon Mambo organza ribbon is wrapped around the card front and I stuck with a polka dot theme and embossed the background with Perfect Polka Dots.

Here's wishing her the best day!

Thanks for stopping by! I hope to post more regularly now that I'm back home and settled!

Card Ingredients:
Stamps: Patterned Occasions
Paper: Pink Pirouette, Melon Mambo, Regal Rose, Whisper White
Ink: Melon Mambo
Tools: Circles Nestabilities, Scallop Circles Nestabilities, 1" circle punch, 1-1/4" circle punch, Perfect Polka Dots embossing folder
Accessories: Melon Mambo organza ribbon, foam sticker (Michael's)
 

Thursday 6 June 2013

Summer Time!

Can't believe we already leave tomorrow! Last night I packed some more and made the bed in our 4Runner. Here's where we will be sleeping for the next couple weeks:


It's going to be comfy I think! Just have to be careful not to bonk our heads when we get up in the morning :P


I really wanted to play along the Mojo sketch this week and when Colour Q came out with a fabulous colour combo and Pink Elephant with the perfect theme, I knew exactly how I was going to piece my card together.


"Summer Time Theme"
 
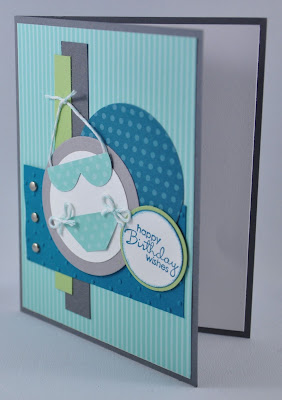
I used Basic Gray in place of Going Gray and Pool Party in place of Soft Sky. I love this colour combo together! For the summer time theme, I wanted to do something 'beachy' since I'm heading down to the California beaches. So, I made a punch art bikini! The fun part is it looks very similar to a bikini I own! Here's how it turned out:
 
 
I thought this would make a perfect birthday card for someone who love the beach. The Island Indigo strip of cardstock is embossed with polka dots and three silver brads are added to embellish the card. I created the bikini with a full heart punch and trimmed it a bit. Bakers twine is added for the bikini strings.


As always thanks for stopping by! And I appreciate all those who take the time to leave comments - they are always encouraging and fun to read! :)
 
**This will be my last post for a couple weeks. I hope to be inspired by the amazing sights we are going to see along the way! I look forward to sharing with you when I get back. I Until then, adios!
 
Card Ingredients:
Stamps: Petite Pairs
Paper: Basic Gray, Certainly Celery, Island Indigo, Pool Party, Whisper White, 2011-2013 In-Colour DSP
Ink: Island Indigo
Tools: Circles Nestabilities, 1-1/4" Circle Punch, 1-3/8" Circle punch, Full Heart punch
Accessories: Silver brads, Pool Party bakers twine

Wednesday 5 June 2013

Inspired By... Eye Shadow!

This week is getting busier and busier! So much to do and so little time. But that will make our vacation that much more worth it in the end!

Today we introduce a new "Inspired By..." challenge!


Karly chose a fun and colourful inspirational photo this week!


At first I wasn't sure how I would design my card using this photo as there is quite a few different colours and shapes! I decided to pick one of the squares and use that as inspiration. I chose the 4-colour eye shadow in the bottom right corner. I like how soft and subtle these colours are together. It's perfect for a wedding card or bridal shower card. I used a fun sketch from Sketch Saturday and a wedding theme from Stampin Up Only.


SUO Challenge #72 – Time for June Weddings!


 I pulled out my Love & Laughter stamp set - my new favourite for wedding cards and used the dress stamp as the central image. I used Pink Pirouette, Crumb Cake, Soft Suede and Very Vanilla for my colour combo. My card came together so nicely!


I used the rock n' roll technique for the dress to make the edges stand out a bit more. I added detail by embossing the card front with little hearts, adding some crochet ribbon and scattered pearls. I just love how this card turned out!


Thanks for stopping by! Make sure to visit Karly's Creations to see how this photo inspired her!

Note: We will be taking a 3 week break from KCRR and Inspired By as I am going on a road trip and Karly will be on vacation as well!

Card Ingredients:
Stamps: Love & Laughter
Paper: Very Vanilla, Crumb Cake, Soft Suede Pink Pirouette
Ink: Crumb Cake, Soft Suede
Tools: 3/4" Circle punch, 1" Circle punch
Accessories: Victoria Crochet Trim ribbon, Pearls (Michael's), Small Hearts Embossing Folder

Tuesday 4 June 2013

KCRR #21 {Thinking of You}

Welcome to another KCRR challenge! We've moved it up a couple days this week as we are both getting ready to go on holidays this weekend (yay!).


For this challenge we decided to randomly choose three items, instead of the usual two:

Spritzing
River Rock
Blossom Petal Punch
 
To be honest, I had a tough time with this one! I guess that's why they call it a challenge :) River Rock is probably my least favourite colour. I find it hard to combine it with other colours. However, I'm glad I had an excuse to use the other two items! My spritzing tool was still in its original package and my blossom petal punch doesn't get much use.
 
I picked a sketch from a card challenge blog that is starting to become one of my favourites for card sketches! It is called Sketchbook Saturday. I love the sketch this week!
 

As you have probably figured out by now, I love layers on my cards :) And this is one is full of them! I chose different shades of blues as a combo with River Rock and I really like the end result!


The butterfly is created using the Blossom Petal punch for the top wings and the Bird Builder punch for the bottom wings. The wings are embossed with Perfect Polka dots. I added pearls to the centre and curled strips of cardstock to make the antenna. I was inspired to create this butterfly when I found this card on Pinterest. What a great idea! I kept the spritzing to a minimal and just spritzed the doily with Night of Navy. It adds that final detailed touch to the design of the card. 


I actually like the colour River Rock in this card. It's so soft and subtle, making it a perfect Thinking of You card.

Thanks for visiting! Hop on over to Karly's Creations to see how she incorporated these three elements in her card.

Card Ingredients:
Stamps: You Are Loved
Paper: Marina Mist, Bashful Blue, Midnight Muse, River Rock, Whisper White, Neutrals DSP
Ink: Midnight Muse, Night of Navy marker
Tools: Blossom Petal punch, Bird Builder punch, Doilies Sizzlit, Spritzing Tool
Accessories: Pearls (Michael's)

Monday 3 June 2013

RS#66 {A Cup of Thanks}

It has been a relaxing and very productive weekend! I had a great time chatting with my younger sister on Skype Friday night. I miss her! It was nice to catch up and 'hang out' like old times. Saturday was spent cleaning our 4Runner, doing laundry, and packing for our road trip (we leave this Friday - yay!). Sunday, after an enjoyable walk, I spent most of the day papercrafting.

And to top it off, a couple of my cards were chosen as honorable mentions last week:


To see the original post, click here.


To see the original post, click here.


For today's card, I'm playing along with a new RetroSketches challenge.


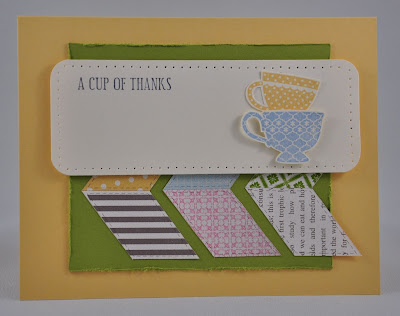
I like the simplicity of this sketch! I rotated it to make it fit my design. The chevron shapes reminded me of the Tea for Two DSP. I cut the chevrons out of the designer paper and chose cardstock to match it. The edges of the Lucky Limeade piece are distressed and a little detail is added to the Very Vanilla cardstock using paper piercing. The tea cups are stamped, cut out, and stacked on top of each other.


Thanks for visiting! Feel free to leave a comment :)
 
Tomorrow we have a new KCRR challenge! (it has been moved up a couple days this week and it will also be our last one for a few weeks as I leave for our road trip this weekend!)
 
Card Ingredients:
Stamps: Tea Shoppe
Paper: So Saffron, Lucky Limeade, Very Vanilla, Tea for Two DSP
Ink: Basic Gray, Bashful Blue, So Saffron
Tools: Distress Tool, Paper Piercing Tool