Showing posts with label Wedding. Show all posts

Monday, 17 March 2014

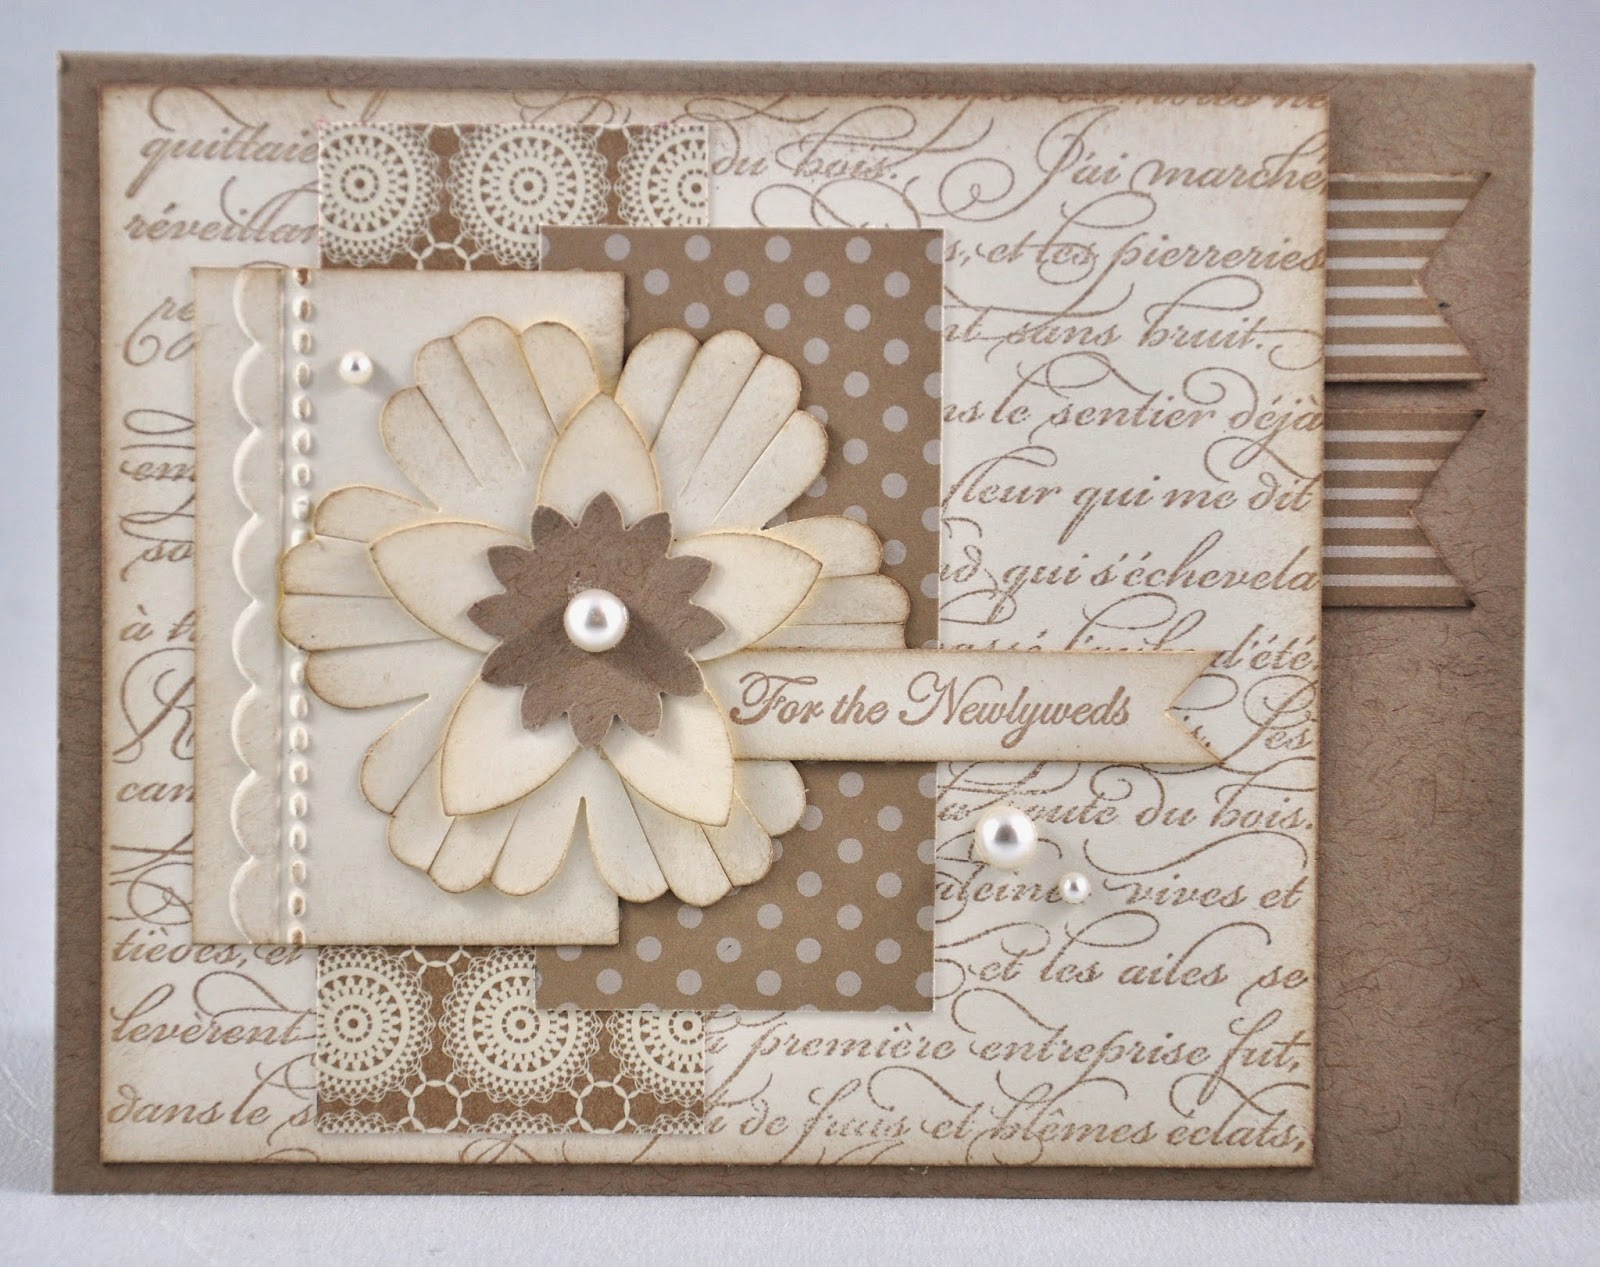
DS142 For the Newlyweds

It's hard to face another work week after a nice relaxing and productive weekend of visiting with friends, crossing things off the to-do list, enjoying the mild weather, and papercrafting! 

I've been working on quite a few wedding and bridal shower cards lately as I seem to be lacking those in my collection of cards. One of the wedding cards I made was inspired by the latest Deconstructed Sketch:


I LOVE the layers in this sketch! I decided to stick with a soft and subtle colour combo for this wedding card: Crumb Cake and Very Vanilla. Here's how it turned out:


I used the elegant French Script stamp for the background, and layered pieces of Crumb Cake designer paper on top. The top layer of Very Vanilla cardstock is embossed with a scallop stitched design. The edges of the punched out flowers and the sentiment are sponged with Crumb Cake ink to soften the look and pearls are added to embellish the card.


Thanks for stopping by! 

Card Ingredients:
Stamps: French Script background stamp, Teeny Tiny Wishes
Paper: Crumb Cake, Very Vanilla, Neutrals DSP
Ink: Crumb Cake
Tools: Needlepoint Border embossing folder, Blossom punch, Five Petal Flower punch, Boho Blossoms punch
Accessories: Pearls (Michael's)

Wednesday, 4 September 2013

A Matching Wedding Card

Yesterday I promised to share with you a wedding card that I made to go along with the bridal shower card (to see this post, click here). I used the same colours (lime green, black and purple) and created a tri-fold card.


I love this fold! It's fun to decorate and looks fantastic in the end! I used Lucky Limeade DSP to cover the inside panels and the two outer panels were embossed with Elegant Lines embossing folder (I often turn to this embossing folder for wedding cards). Candy dots embellish the inside panels and rhinestones adds that extra detail to the embossed cardstock.

Thanks again for stopping by!

Card Ingredients:
Stamps: Bloomin Marvelous, Petite Pairs
Paper: Basic Black, Lucky Limeade, Whisper White, Elegant Eggplant, 2011-2013 In-Colour DSP
Ink: Elegant Eggplant, Lucky Limeade
Tools: Delicate Doilies die, Circles nestabilities, Elegant Lines embossing folder
Accessories: Elegant Eggplant candy dots, rhinestones (Michael's), purple grosgrain ribbon (Michael's), Lucky Limeade ruffled ribbon (ret.)

Tuesday, 3 September 2013

End of Summer and a Bridal Shower Card

Another road trip has come and gone and the summer is quickly coming to an end. But what a fantastic summer it has been! I've enjoyed many adventures with Kevin and family, from a road trip down to California, to a visit with my sister and brother-in-law, and several mini vacations in between. So many awesome memories that I will never forget! Looking forward to scrapbooking the thousands of beautiful photos!

Here are a few photos of our weekend in sunny Okanagan:

Kal Beach on Kalamalka Lake

Sitting on the pier enjoying the sunshine :)

Sun peaking through the trees on our campsite
 
-----------------------------------------------------------------
 
A couple weeks ago, a friend asked me to make a bridal shower card with the bride's wedding colours: lime green, black, and purple. Well, I have to say, this was a bit of a challenge for me! Bridal shower cards are not always the easiest to make, but I did some brainstorming and Pinterest-browsing and came up with this design:


It took a while for this card to grow on me, but now I really like it! I created a square 5" x 5" card and used Lucky Limeade, Basic Black and Elegant Eggplant for the colour combo. I hung a couple banners from the 'clothes line', one with the stamped sentiment "bridal shower" and the other with a heart clip embellishment. I stamped an umbrella from the "Rain or Shine" stamp set and added small flowers in purple with pearls in the middle of each flower. The sentiment "celebrate" is stamped on a decorative image that is clipped on with a mini clothes pin.

 
As you can see, I've also added some detail to the inside of the card. Here's a closer look:


And finally, a handmade envelope to go with the card:


Tomorrow I will share with you the wedding card I made in the same colours!
 
Thanks for stopping by!
 
Card Ingredients:
Stamps: Fabulous Phrases, Rain or Shine
Paper: Basic Black, Lucky Limeade, Whisper White, Elegant Eggplant, 2011-2013 In-Colour DSP
Ink: Black Staz-On, Lucky Limeade
Tools: Itty Bitty punch, Distress tool
Accessories: Cute Clip, Pearls (Michael's), Mini Clothespin, Black bakers twine (CTMH), Hemp twine

Wednesday, 5 June 2013

Inspired By... Eye Shadow!

This week is getting busier and busier! So much to do and so little time. But that will make our vacation that much more worth it in the end!

Today we introduce a new "Inspired By..." challenge!


Karly chose a fun and colourful inspirational photo this week!


At first I wasn't sure how I would design my card using this photo as there is quite a few different colours and shapes! I decided to pick one of the squares and use that as inspiration. I chose the 4-colour eye shadow in the bottom right corner. I like how soft and subtle these colours are together. It's perfect for a wedding card or bridal shower card. I used a fun sketch from Sketch Saturday and a wedding theme from Stampin Up Only.


SUO Challenge #72 – Time for June Weddings!


 I pulled out my Love & Laughter stamp set - my new favourite for wedding cards and used the dress stamp as the central image. I used Pink Pirouette, Crumb Cake, Soft Suede and Very Vanilla for my colour combo. My card came together so nicely!


I used the rock n' roll technique for the dress to make the edges stand out a bit more. I added detail by embossing the card front with little hearts, adding some crochet ribbon and scattered pearls. I just love how this card turned out!


Thanks for stopping by! Make sure to visit Karly's Creations to see how this photo inspired her!

Note: We will be taking a 3 week break from KCRR and Inspired By as I am going on a road trip and Karly will be on vacation as well!

Card Ingredients:
Stamps: Love & Laughter
Paper: Very Vanilla, Crumb Cake, Soft Suede Pink Pirouette
Ink: Crumb Cake, Soft Suede
Tools: 3/4" Circle punch, 1" Circle punch
Accessories: Victoria Crochet Trim ribbon, Pearls (Michael's), Small Hearts Embossing Folder

Thursday, 23 May 2013

KCRR #19 and FMS #87 {Love & Laughter}

Can't believe it's already Thursday! Love short work weeks :)

Today we introduce a new KCRR challenge!


The two elements randomly chosen are:

Petite Pennants Builder Punch
Love & Laughter Stamp Set
This actually was more of a challenge then I initially thought. I don't normally use banners on my wedding cards, so I looked on Pinterest for some ideas on different ways to use the Petite Pennant Builder punch and came across this fun card!  I used it as inspiration and created a pennant pattern using Crumb Cake designer paper.

I followed the new sketch by Freshly Made Sketches. I decided to flip the sketch since it worked a bit better with my design.

The card front is embossed with Elegant Lines. The cake from the Love & Laughter stamp set is stamped in Crumb Cake and little flowers with pearls are added to embellish it. I created a shadow behind the oval shape using Soft Suede cardstock. Crochet trim ribbon and roses with pearls embellish the card.


Thanks for visiting! Join us tomorrow with a fun "Inspired By..." challenge!

Card Ingredients:
Stamps: Love & Laughter
Paper: Very Vanilla, Crumb Cake, Soft Suede, Neutrals DSP
Ink: Crumb Cake
Tools: Itty Bitty Shapes punch, Petite Pennant Builder punch, Elegant Lines embossing folder, Ovals nestabilities
Accessories: Victoria Trim ribbon, Flower Trim ribbon, pearls (Michael's)

Tuesday, 23 April 2013

Dynamic Duos #49 and Make My Monday {Wedding Tri-Fold Card}

I had a fun night out last night crafting with a bunch of wonderful ladies! I love attending Cassandra's card classes. (She is my upline for Stampin Up). She gives me lots of inspiration and I look forward to her classes every month! We made 3 beautiful cards:


I love the box card! It's such a fun fold. I'm definitely going to try that one again!

For today's post, I'm playing along with Dynamic Duos and Make My Monday. I thought the colour combo this week would be perfect for a wedding card and I love making fancy folded cards (the challenge this week at Make My Monday is "Fancy Folds").


I made one of my favourite folds - the Tri-Fold. I love this fold for special occasions, like weddings and birthdays. It makes such an elegant card! The actual card base is very easy to make. The only time-consuming part is decorating it, as you have to cut the pieces of designer paper just so to fit the panels on the inside of the card. But, it's worth it in the end! I love the result!
 

I placed textured designer paper on the card front and punched out flowers with an antique brad for the central image. Gray striped bakers twine is tied around the card front and tiny tags hang from it - one of them says "Mr. & Mrs." and the other has an elegant design.
Here are photos of different angles:


The great thing about this card is that it folds flat to 4.25" x 5.5" size and fits perfectly in an A2 size envelope.

Thanks for visiting!

Card Ingredients:
Stamps: Tiny Tags
Paper: Basic Black, Basic Gray, Whisper White, Mocha Morning DSP (ret.), Wedding DSP (Michaels)
Ink: Basic Black
Tools: Scallop Circle Nestabilities, Circle Nestabilities, Blossom punch, Five Petal Flower punch, Tiny Tag punch, Elegant Lines embossing folder
Accessories: Gray Bakers Twine (CTMH), Antique brad

Wednesday, 17 April 2013

Try Stampin' Challenge #114 {An Elegant Wedding Card}

I had a busy evening of crafting last night! Finished off some gift tags, made a few masculine cards and a couple wedding cards. I'm well on my way to having lots of variety for the upcoming craft fair this Sunday! Although, I must say... my craft room is a mess! Scraps of paper everywhere! I have one little spot on my desk, just room enough to make a single card. Can't wait to clean and organize everything! Once all this craft fair craziness is done, I plan on doing a series of blog posts on how I organize my craft room - stay tuned!

For today's card, as I'm building up my stock of wedding cards, I decided to follow the new sketch by Try Stampin' on Tuesday.


I just got a new wedding stamp set with my last Stampin Up order called "Love and Laughter" It's so elegant and fun! I decided to use the 3-tier cake stamp as the central image in my card. I used the colour combo of Baja Breeze and Very Vanilla for a softer look - perfect for a wedding card! Here's how it turned out:


I love the burlap ribbon I got from Close to My Heart. It's perfect for cards just like this one. I decided to overlap two different types of ribbon and I love the look! I added little punched out flowers on the cake with pearls in the centers and embellished the card with ivory roses -- this has become an essential embellishment on my cards lately!


Thanks for looking!
 
Card Ingredients:

Stamps: Love & Laughter
Paper: Baja Breeze, Very Vanilla
Ink: Baja Breeze
Tools: Circles Nestabilities, Itty Bitty punch
Accessories: Pearls (Michaels), Burlap ribbon (CTMH), Victoria Trim ribbon, Flower Trim ribbon

Tuesday, 16 April 2013

Retro Sketch Challenge #59 {Happy I Do Day}

I was just thinking the other day about our upcoming road trip along the west coast. It's less than two months away! I have booked all the lodging and main events and created a day-to-day itinerary of all the things that we must see! It's going to be an awesome trip! This past weekend I booked a snorkeling tour in La Jolla Cove, California. I am especially excited for this since I've never snorkeled before! We get to see tiger sharks up close - how cool is that?!

For today's card, I decided to do something clean and simple, yet elegant. I got my inspiration from the Retro Sketches challenge this week. I love the simplicity of this sketch.


I decided to make an elegant wedding card using this sketch. The flowers reminded me of Stampin Up's flower trim ribbon and I thought they would fit perfectly in the design of my card. I used Crumb Cake and Very Vanilla colour combo. I don't like a lot of white space in my cards, so I decided to stamp the background with the French Filigree stamp -- perfect for a wedding card, I think!


Thanks for stopping by!
 
Card Ingredients:
Stamps: Word Play, French Filigree (ret.)
Paper: Very Vanilla, Crumb Cake
Ink: Crumb Cake
Accessories: Flower Trim Ribbon

Saturday, 6 April 2013

Inspired By... A Beautiful Vintage Headband

It's the weekend! So happy Saturday is finally here - I get to see my hubby today! It's been a long week filled with ups and downs (yesterday, especially, dragggged on!). Hoping this will be a productive weekend! I need to build up my stock of crafty items!

Saturday means a new challenge with...
It was my pick this week and I came across a photo of a beautiful headband that I found on Etsy.


Isn't it gorgeous?! I love the spring colours and the vintage style. The lady who made this headband is so talented! Take a look at her Etsy shop: Aldona's Boutique.

I was so inspired by this photo! I incorporated the colours, as well as the vintage style into my card. The elegance of it is perfect for a newlywed greeting card!


I just LOVE how it turned out! It is somewhat different than what I usually create. I may have to incorporate this vintage style into more of my cards. I started off with a sketch from My Favourite Things. And my creative imagination went from there!

I wrapped Victoria Crochet trim ribbon around the card front - I thought it was a perfect resemblance of the head band itself. I cut roses from the Flower Trim ribbon and sponged each one with different colours. Strips of flagged ribbon are added. I stamped the Ribbon Cotton with Bloomin Marvelous stamps in Tangerine Tango and Old Olive and sponged them lightly to give them some colour. I then added pearls to embellish the roses. I am also entering this card in the Stampin Royalty challenge this week. Their theme is "Ribbons and Pearls".


This is definitely one of my favourite wedding cards!

Make sure to check out how this photo inspired Karly by visiting her blog, Karly's Creations!

Thanks for stopping by! Enjoy your Saturday!

Card Ingredients:
Stamps: Teeny Tiny Wishes
Paper: So Saffron, Tangerine Tango, Very Vanilla, Pear Pizzaz, Old Olive, Summer Smooches DSP, Brights DSP
Ink: Tangerine Tango, So Saffron, Old Olive, Cherry Cobbler
Tools: Little Leaves sizzlits die, Circles Nestabilities, Word Window punch
Accessories: Pearls (Michael's), So Saffron grosgrain ribbon, Ribbon Cotton, Victoria Crochet Trim ribbon

Saturday, 9 February 2013

A Card Sketches Book and a Feathered Top Hat

Good morning!

It's the start of what's going to be a productive long weekend! That's my goal anyway :) I hope to complete a few custom orders, do some housecleaning, create a budget, do some baking, and more road trip researching! It's ambitious, but doable! In between my tasks on my to-do list, I want to enjoy the sunny mild winter weather that's forecasted for this weekend and catch up on a couple TV shows. Should be a great weekend!

When it comes to designing a greeting card, I often have to plan ahead on the layout, and decide on what colours, stamps, and accessories I'm going to use. I like to have a visual before I sit at my crafting table, so I sketch my ideas on paper. It started with drawing on notepads at work....

But these would end up scattered over my small workspace, making my desk look so cluttered! So, I thought of a solution... I went to my favourite crafting store - Michael's - and checked out the sketchbook aisle. They happened to have a sale that day - buy one, get one for 1 cent. Perfect! I found two small sketchbooks -- the perfect "purse-size". I decorated the front cover and voila!
 
Now all my sketches will be in one place!


I'm excited for this week's challenge!
The inspiration photo comes from a local Prince George artist. At the craft fairs that I participated in last fall, I met quite a few talented vendors, one of them being Amanda Jean of "Orange U CreativE". She is such a sweet and super-talented lady! She makes feathered creations from earrings to necklaces to head pieces. All of her stuff is so gorgeous! I purchased a few pairs of earrings from her and absolutely LOVE them!  (Check out her facebook page: Orange U CreativE) One of her unique items became the inspirational photo that I chose for this week's "Inspired By..." challenge:
 
 
This is a mini top hat to be used as a head piece. It is so unique! I love how it is all pieced together. I see elegance and 'wedding' when I see this photo. I sketched out an idea in my handy dandy sketchbook...
 
 
I thought of using a new technique that I hadn't tried yet. It's called the Starburst Technique. The stripes on the top hat made me think of this. I had seen a few samples on pinterest and have been meaning to try it! I will show you the step-by-step instructions. It's very simple!
 
1) Cut a piece of cardstock 4" x 5.25". It doesn't matter what colour - it will be covered up. I chose to use white.
 
2) Cut three pieces of patterned designer paper into strips of 1.5" x 4.5". (It can be three different patterns, or just two. I decided on two patterned papers for this card). Then cut each of these strips corner to corner so you end up with six triangles.


3) I sponged each triangle piece with Basic Gray to give it a softer, antique look. Arrange the triangles on the cardstock so that they slight overlap each other. Don't glue them down until you are happy with it. It should look something like this:
 
 
4) Trim around the base of the cardstock to clean up the edges:


5) Finish it off by adding a strip of cardstock on the bottom. It can be any colour that you like. In my case, I'm going to glue on a strip of Basic Black cardstock:
 
 
And there you have it! Simple, right?
 
Here's my completed card:
 
 
I scrunched up Cherry Cobbler seam-binding ribbon to tie it all together. The sentiment "happy I do day" is stamped with VersaMark and heat embossed with pewter embossing powder. I made paper feathers and added hearts and rhinestones to complete the card.
 
 
I may have tweeked my sketch a little bit as I was making the card, but I love the final product!
 
Make sure to stop by Karly's Creations to see how this photo inspired her!
 
Card Ingredients:
 
Stamps: Word Play
Paper: Basic Gray, Basic Black, Whisper White, Cherry Cobbler, Neutrals Collection DSP
Ink: VersaMark
Tools: Labels Framelits, Heart to Heart punch, Heat tool
Accessories: Pewter Embossing Powder, Rhinestones, Cherry Cobbler seam-binding ribbon
 
Thanks for visiting!