Showing posts with label Teeny Tiny Wishes. Show all posts

Thursday, 25 June 2015

Father's Day Weekend Recap

Last weekend was a busy one! Saturday I spent the day with two of my nieces. We had a great time together! I know these two girls (ages 3 and 7) love to craft. Each time they come over, they head straight to my craft room wanting to draw, write messages to friends, stamp, and glue paper cut-outs to create their own piece of art. So, since I had them for the day, I wanted to organize a crafting 'workshop' for them. Father's Day was the next day, so I thought it would be perfect for them to make their own cards for their Dad. I created a couple samples for them to follow:


Simple with lots of white space for them to add to it. They loved it! It was so fun to watch them think of how they wanted to decorate their cards, making it their own. I find crafting brings out creativity in most people, especially kids.


I also gave them a couple more blank cards for them to decorate for any occasion. Here they are showing off their completed cards:


Father's Day was a special day this year, as we celebrated my husband's first year being a father! Kevin is a wonderful father to our little girl. He loves her so much! I had Raya make him her first card...


It was quite the challenge to try and get her hand prints... as you can see on the card front, I was unsuccessful, but it still looks like a piece of art, right? :)
Tracing her hand and foot was a little easier.
My hubby loved this card!


I decided to make a card with a gardening theme. Kevin has been working on our gardens quite a bit over the past couple months and is doing such a great job! Not only did he plant trees, bushes and flowers, he also made a vegetable garden with its own irrigation system - very impressive!


In fact, we harvested our first vegetable - radishes - a couple weeks ago. So fun to watch everything grow from seeds!


Having said that, here's the card I made for Kevin:


I was inspired by this card and decided to CASE it, however making it somewhat my own by adding woodchips in the wheelbarrow and a spade shovel on the side. Both the wheelbarrow and shovel were made from scratch using pieces of cardstock.

And finally, I made a Father's Day card for my dad and father-in-law, using the "Building Blocks" card fold.

For this card I used the tie stamp from the "Something for Baby" Stampin Up stamp set. I thought it was perfect for my Dad as he loves to wear a shirt and tie every now and again.

We refer to my father-in-law as "Pop". He celebrated a birthday also this past week so I added a 2nd sentiment on this card :)

Building Blocks Card Fold Instructions:

To make this card fold, simply start with a piece of cardstock measuring 5.5" x 10.5". Score on the long side at 3.5" and 7". Fold to create one mountain fold and one valley fold.
To create the blocks, cut 1.5" in from the valley fold at the following measurements:
3/8", 1-5/8", 2-1/8", 3-3/8", 3-7/8" and 5-1/8".
Decorate each panel as you like!

Monday, 28 April 2014

Sweet Sorbet Birthday Card

One of my favourite Stampin Up designer series paper this Spring is the Sweet Sorbet collection. I love the patterns and the bright colours. I decided to make it the central focus on the card I'm going to share with you today. As always, Cardabilities has a fabulous sketch this week and I'm entering this card just in the knick of time. 


Not only did I use the designer paper for the card front, I also die cut flowers from the DSP as well, and I love the way it turned out! All it needed was a simple birthday sentiment against the busy background and pearls to embellish the flowers. 


Finish it off with a matching envelope and voila! 


Thanks for stopping by! 

Card Ingredients:
Stamps: Teeny Tiny Wishes
Paper: Crisp Cantaloupe, Sahara Sand, Pool Party, Pistachio Pudding, Whisper White, Sweet Sorbet DSP
Ink: Crisp Cantaloupe, Pool Party
Tools: Floral Fusion sizzlit die, Little Leaves sizzlit die, Itty Bitty punch
Accessories: Pearls (Michael's)

Monday, 17 March 2014

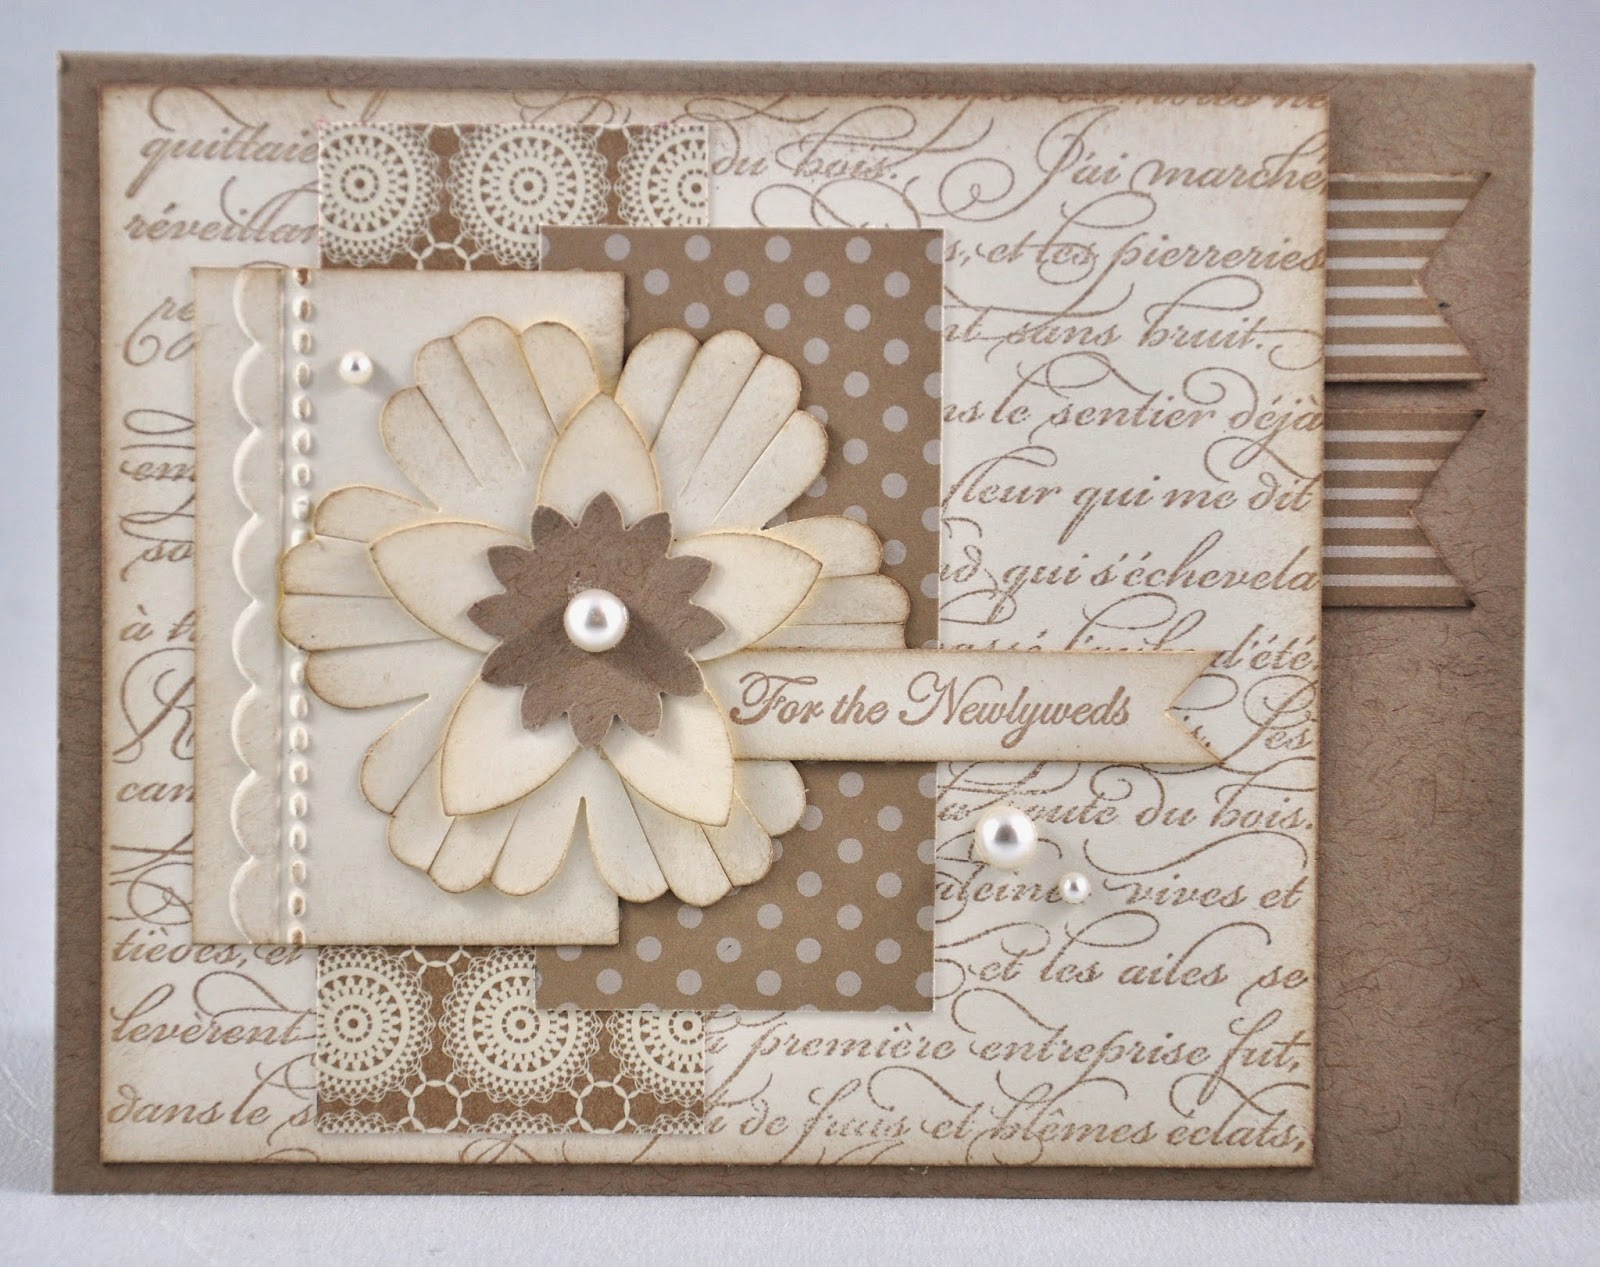
DS142 For the Newlyweds

It's hard to face another work week after a nice relaxing and productive weekend of visiting with friends, crossing things off the to-do list, enjoying the mild weather, and papercrafting! 

I've been working on quite a few wedding and bridal shower cards lately as I seem to be lacking those in my collection of cards. One of the wedding cards I made was inspired by the latest Deconstructed Sketch:


I LOVE the layers in this sketch! I decided to stick with a soft and subtle colour combo for this wedding card: Crumb Cake and Very Vanilla. Here's how it turned out:


I used the elegant French Script stamp for the background, and layered pieces of Crumb Cake designer paper on top. The top layer of Very Vanilla cardstock is embossed with a scallop stitched design. The edges of the punched out flowers and the sentiment are sponged with Crumb Cake ink to soften the look and pearls are added to embellish the card.


Thanks for stopping by! 

Card Ingredients:
Stamps: French Script background stamp, Teeny Tiny Wishes
Paper: Crumb Cake, Very Vanilla, Neutrals DSP
Ink: Crumb Cake
Tools: Needlepoint Border embossing folder, Blossom punch, Five Petal Flower punch, Boho Blossoms punch
Accessories: Pearls (Michael's)

Thursday, 20 February 2014

KCRR #36 - A Vintage Anniversary Card

I've had a pretty productive week so far! Organizing my craft room has been top on my to-do list lately and I'm close to checking it off as being complete! I hope to share some of the organization tips I used within the next week, so stay tuned! 

Let's introduce a new KCRR challenge!


Strawberry Slush
Vintage Style
Teeny Tiny Wishes Stamp Set

We decided to keep choosing three items (instead of two). I think it's fun and a tad more challenging!

There are two other challenges I wanted to play along with. The first is a card sketch from a new challenge blog that I came across just recently. I absolutely love their card sketches and couldn't wait to play along! Cardabilities, it's called (check them out!). Here's the sketch this week:


And The Card Concept has a theme this week:


I'm going with a 'shabby chic and vintage' style for my card design and using my Stampin Up colour coach, I chose Rich Razzleberry and Crumb Cake to go with Strawberry Slush. I think these colours are fabulous together! 


I layered cardstock to make up the card front and distressed and sponged the edges. Though hard to see, I stamped lines on the Crumb Cake cardstock. Strawberry Slush ruffled ribbon wraps around it. The fabric flowers are one of my favourite embellishments to use and I think they work perfectly in this card design. I sponged each flower with Rich Razzleberry ink and added pearls to embellish them. Here's a closer look:


Thanks for stopping by! Feel free to play along with our KCRR challenge! (just post a link to your blog post in the comments below)

Come back tomorrow for a new inspirational photo challenge! 

Card Ingredients:
Stamps: Bliss (Sale-A-Bration ret.), Gorgeous Grunge, Teeny Tiny Wishes
Paper: Rich Razzleberry, Strawberry Slush, Crumb Cake, Very Vanilla
Ink: Rich Razzleberry
Tools: Circles nestabilities, Little Leaves sizzlit, Distress tool
Accessories: Flower trim, Strawberry Slush ruffled stretch trim

Wednesday, 29 January 2014

KCRR meets Deconstructed Sketch - A Patterned Occasions Baby Card

A 2nd post of the day, a little unusual... but I just had to participate in this week's Deconstructed Sketch challenge! I decided to combine it with our KCRR challenge (posting this a day early :)).


Elements to use this week:

Patterned Occasions Stamp Set
Pistachio Pudding
Ruffled Stretch Trim

Combine it with this fabulous sketch:


And this is the end result:


When we randomly chose Patterned Occasions as one of the elements, I tend to lean to... a baby card! The little elephant in this stamp set is so cute! I wanted to make use of the other stamps, however when Pistachio Pudding is one of the colour elements, it just seemed like the perfect pastel colour for a baby card. And so I went with it... I chose Smokey Slate for the card base and added in Crisp Cantaloupe and Calypso Coral. I finally got to make use of the new In-Colour Boutique Details!


And finish it off with a matching envelope...


Card Ingredients:
Stamps: Patterned Occasions, Teeny Tiny Wishes
Paper: 2013-2015 In-Colour DSP paper stack, Smokey Slate, Calypso Coral, Crisp Cantaloupe, Whisper White
Ink: Smokey Slate, Calypso Coral
Tools: 1-3/8" Circle punch, Large Scallop Circle punch, Word Window punch
Accessories: Pistachio Pudding Ruffled Stretch Trim, 2013-2015 In-Colour Boutique Details, Rhinestones (Michael's)

Monday, 14 October 2013

Gobble-Gobble

Happy Thanksgiving to all my Canadian readers out there! Hope you are enjoying this beautiful weekend! Here in northern BC, it has been beautiful and sunny! Yesterday we took a hike through "Forests for the World", a local park. The fall colours were bright and there was not a cloud in the sky!


Today I'm going to share a Thanksgiving card that I made last year, using punch art. I got inspiration from a post I found on Pinterest (can't seem to find the post, unfortunately) and created my own version of a comical turkey!

 
The feathers are punched in Cajun Craze, More Mustard and Real red using a Small Oval punch. The head is also punched with a Small Oval as well, and the body is the 1-3/4" Circle punch. Scallop Circles are used for the front wings. The beak is a petal from the Five-Petal Flower punch and for the wattle I used the small heart from the Heart to Heart punch. The feet are the Word Window punch cut in half.
 
 
It's a bit tedious to put together, but I love the end result!

Enjoy your Thanksgiving celebrations today! I am missing family in Ontario, but I'm so thankful I can spend it with my husband, Kevin, and dog, Keta! We are having a nice quiet weekend together! At this time of year, I am reminded to give thanks for all the countless blessings God has given us! I think of this verse and even though we may want different circumstances at this point in our lives, we need to be thankful for what God has provided for us:
 
 
Card Ingredients:
Stamps: Teeny Tiny Wishes
Paper: More Mustard, Early Espresso, Chocolate Chip, Cajun Craze, Real Red, Daffodil Delight, Whisper White, Basic Black, Orchard Harvest DSP
Ink: Early Espresso
Tools: Scallop Circle punch, 1-3/4" Circle punch, Small Oval punch, Word Window punch, 1/2" Circle punch, 1-hole punch, Five Petal Flower punch, Heart to Heart punch, Modern Label punch, Circles Nestabilities

Tuesday, 16 July 2013

Mini Onesies

It was hard to come back to work after such a great weekend! After spending some good quality time with the in-laws, I realize how much I miss having family around! I look forward to the day when we can be just a short drive away from them, rather than living across the country (as much as I love beautiful B.C.!)

One of the highlights from the weekend was floating down the Nechako River in PG. While the weather didn't quite cooperate, we still had a great time!


...yes, it's pouring rain! But, I had my hunny to warm me up :)


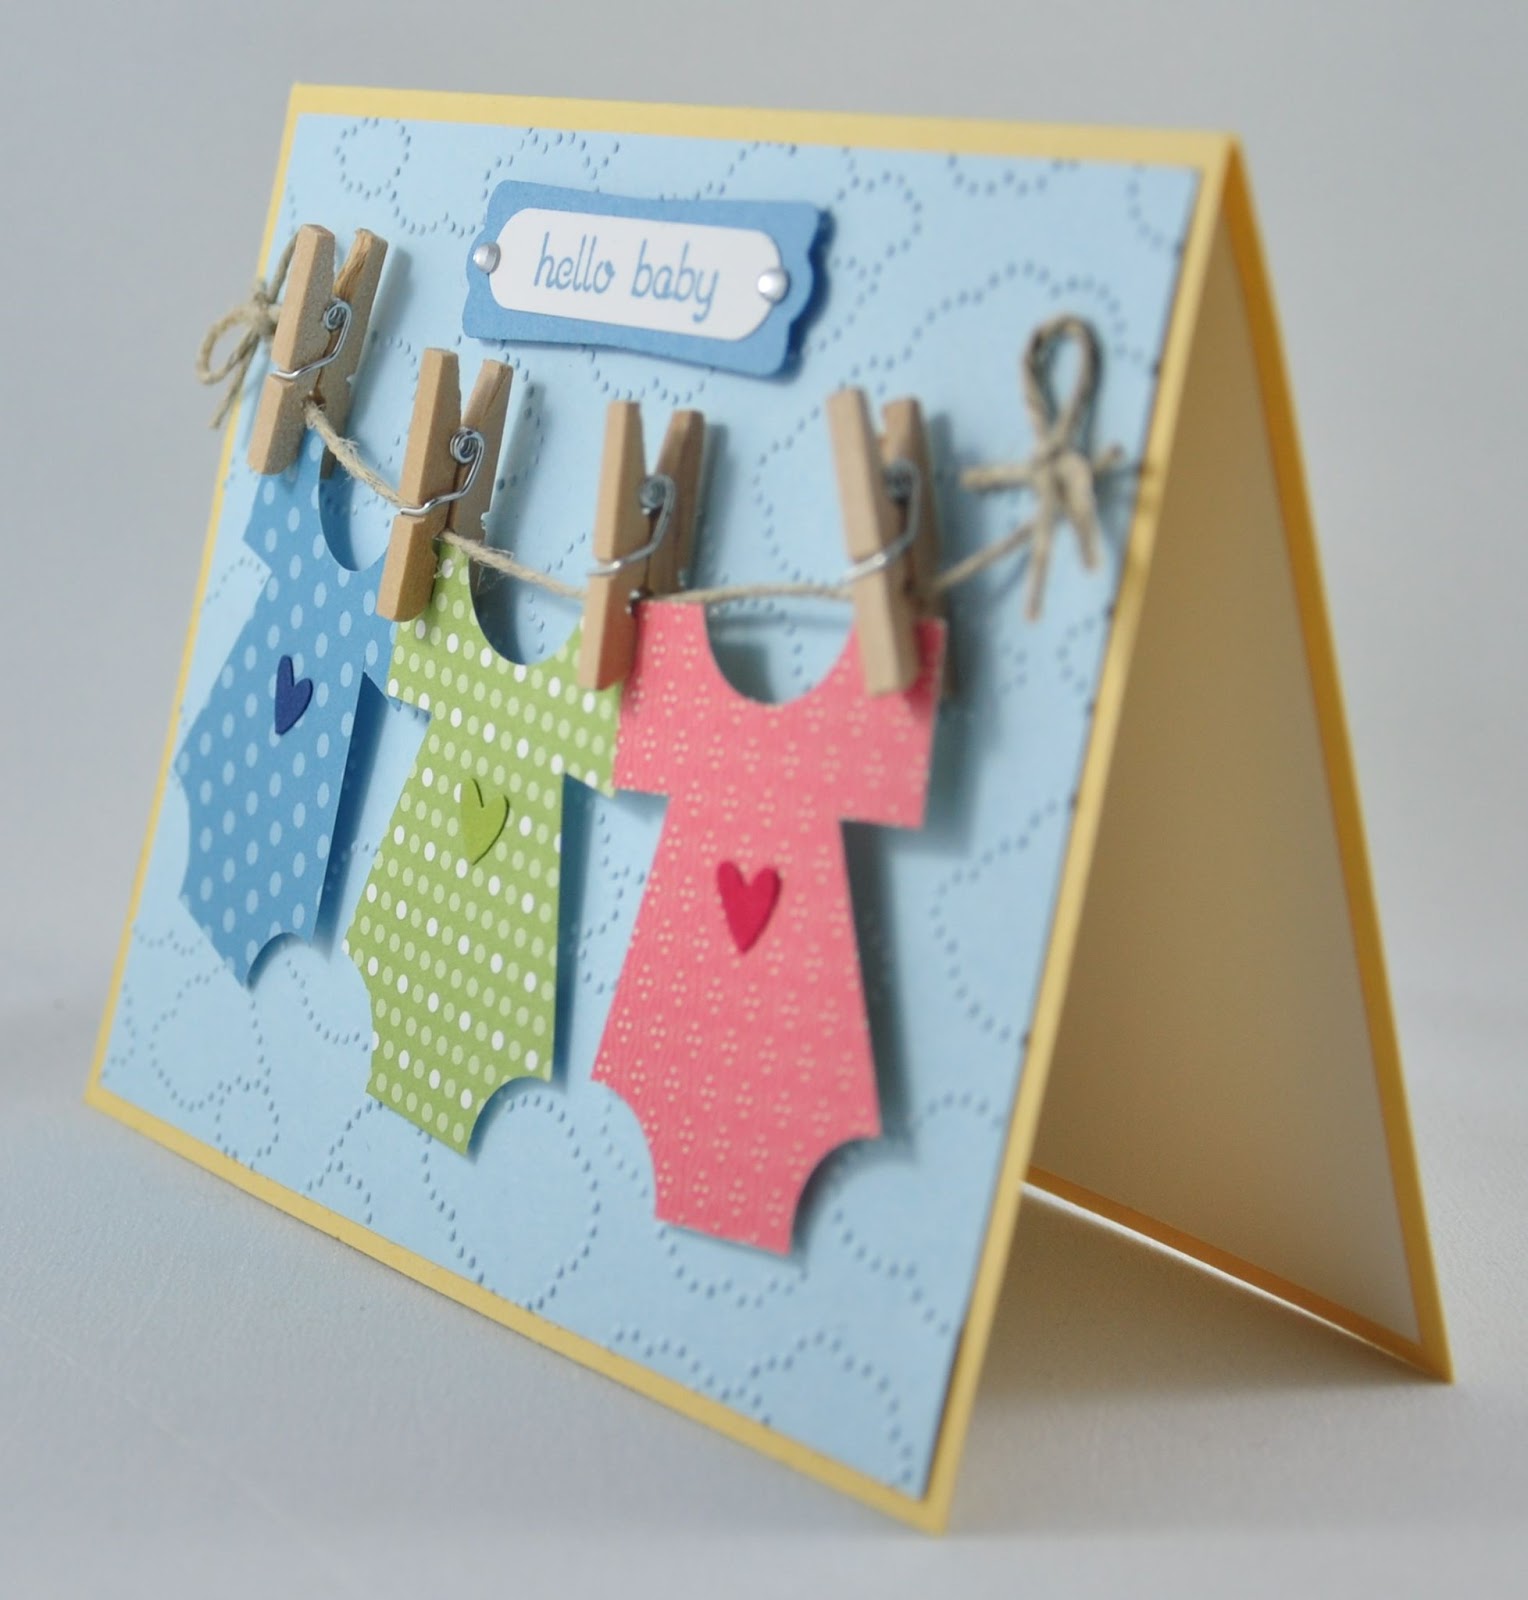
Today I'm going to share a card that has become one of my favourites! A while ago I was given mini clothespins to use on my cards and haven't quite found a use for it until now! I thought it would be so adorable to use them for hanging  little onesies from a 'clothes line'. Mini onesies are super easy to make -- click here to see the video tutorial.

I made three onesies from different patterned designer paper and just love the end result!

 
The card front is embossed with the Clouds embossing folder to make it look like sky. I used hemp twine for the 'clothes line' and hung the mini onesies from it (adding some glue dots to the clothes pins to keep them in place). I then simply added little hearts to each onesie and completed the card with a sentiment. Adorable right?


Thanks for stopping by! Hope you feel inspired to make these adorable onesies -- they can be addicting!
 
Card Ingredients:
Stamps: Teeny Tiny Wishes
Paper: So Saffron, Bashful Blue, Marina Mist, Whisper White, Subtles DSP, Nursery Nest DSP, Elementary Elegance DSP
Ink: Marina Mist
Tools: Modern Label punch, Word Window punch, 1/2" Circle punch, Owl Builder punch, Clouds embossing folder
Accessories: Hemp twine, mini clothespins, rhinestones

Sunday, 3 March 2013

Freshly Made Sketches #75

Yesterday was PJ day for me :) Stayed in my PJ's till about 3:30PM, believe it or not! In all that time I did some laundry, house cleaning, skype calling, papercraft organizing and more trip planning. I pretty much completed our road trip itinerary. Still need to do some tweeking, but managed to include most of the top sites we want to see! A few things I'm super excited about -- swimming with dolphins, snorkeling at La Jolla Cove and sun bathing on the California beaches!

One of the highlights to my day was receiving an email from my hubby! He's safe and sound on the boat in QCI! It was so good to hear from him. I miss him so much!

Another highlight -- a fun skype call with my Mom and sister, Esther. Wish I could be there to hang out with them...


Today's card was based on the Freshly Made Sketches challenge this week:

 
At first glance, I thought this was too clean and simple for my taste. But then I brainstormed what I could use for the big open space. I was inspired by Jennifer Brum's card and thought of the poppies paper from the Floral District collection. I added some pleated ribbon and the sentiment "happy mother's day" and this is how it turned out:


While Mother's Day is still a couple months away, I thought I'd get a good head start on some cards for my Etsy Shop. I added dimension to some of the flowers by punching out circles from the same paper and popping them up with dimensionals.


Thanks for stopping by!
 
Card Ingredients:
 
Stamps: Teeny Tiny Wishes
Paper: Tangerine Tango, Whisper White, Floral District DSP
Ink: Tangerine Tango
Tools: 1-3/8" Circle punch
Accessories: Pleated Lucky Limeade Ribbon

Wednesday, 27 February 2013

Mojo 282 {Going Green}

Tuesday was a long day. It seems this week is dragging on... I was exhausted when I came home from work (the consequence of late nights!) I am truly a night owl, but tonight I may have to hit the pillow a tad earlier than normal!

To beat the winter blues, I have been doing a lot of research lately on top sites to see along the west coast for our road trip in June - I'm SO excited! We plan on staying a couple days in California and one of the things I've found to do there is snorkeling at La Jolla Cove - we can see all kinds of fish including leopard sharks! I think, for me, California will be one of the main highlights of our trip. I just love the sun and beaches and the ocean! June cannot come soon enough!

For today's card, I'm playing along with a few different card challenges, one of them being another great sketch from Mojo Monday.


A couple other card challenge blogs that I've been following have a similar theme this week:

Stampin Up Only Challenges has a "Going Green" challenge this week and Late Night Stamper's theme is "Celebrating St. Patrick's Day".

I decided to incorporate all three challenges into one great card!

 
The outer borders of the card front are embossed with the Tulip Frame embossing folder and sponged lightly with Old Olive ink. I layered designer paper from the "Tea for Two" DSP collection with a piece of Always Artichoke cardstock. A swirl design is stamped in Old Olive for the background. I created a 3-leaf clover using the Small Heart punch. Each 'petal' was folded in half to create a crease in the center and then sponged with Always Artichoke ink. The stem was punched out from the Bird Builder punch. It is placed on a layered scallop circle. The clover took a little practice to find out which heart punch would work best! I tried the Heart to Heart punch, but found that this Small Heart punch had the best shape and a good size for the clover. Finally, I stamped the sentiment "happy st. patrick's day" in Old Olive ink to complete the card.


Thanks for stopping by!

Card Ingredients:

Stamps: Teeny Tiny Wishes, Everything Eleanor
Paper: Always Artichoke, Old Olive, Very Vanilla, Tea for Two DSP
Ink: Old Olive, Always Artichoke
Tools: Frame Tulip Embossing Folder, Scallop Circle Punch, 1-3/8" Circle punch, 1-1/4" Circle Punch, Small Heart Punch, Bird Builder Punch