Showing posts with label Crumb Cake. Show all posts

Thursday, 25 June 2015

Father's Day Weekend Recap

Last weekend was a busy one! Saturday I spent the day with two of my nieces. We had a great time together! I know these two girls (ages 3 and 7) love to craft. Each time they come over, they head straight to my craft room wanting to draw, write messages to friends, stamp, and glue paper cut-outs to create their own piece of art. So, since I had them for the day, I wanted to organize a crafting 'workshop' for them. Father's Day was the next day, so I thought it would be perfect for them to make their own cards for their Dad. I created a couple samples for them to follow:


Simple with lots of white space for them to add to it. They loved it! It was so fun to watch them think of how they wanted to decorate their cards, making it their own. I find crafting brings out creativity in most people, especially kids.


I also gave them a couple more blank cards for them to decorate for any occasion. Here they are showing off their completed cards:


Father's Day was a special day this year, as we celebrated my husband's first year being a father! Kevin is a wonderful father to our little girl. He loves her so much! I had Raya make him her first card...


It was quite the challenge to try and get her hand prints... as you can see on the card front, I was unsuccessful, but it still looks like a piece of art, right? :)
Tracing her hand and foot was a little easier.
My hubby loved this card!


I decided to make a card with a gardening theme. Kevin has been working on our gardens quite a bit over the past couple months and is doing such a great job! Not only did he plant trees, bushes and flowers, he also made a vegetable garden with its own irrigation system - very impressive!


In fact, we harvested our first vegetable - radishes - a couple weeks ago. So fun to watch everything grow from seeds!


Having said that, here's the card I made for Kevin:


I was inspired by this card and decided to CASE it, however making it somewhat my own by adding woodchips in the wheelbarrow and a spade shovel on the side. Both the wheelbarrow and shovel were made from scratch using pieces of cardstock.

And finally, I made a Father's Day card for my dad and father-in-law, using the "Building Blocks" card fold.

For this card I used the tie stamp from the "Something for Baby" Stampin Up stamp set. I thought it was perfect for my Dad as he loves to wear a shirt and tie every now and again.

We refer to my father-in-law as "Pop". He celebrated a birthday also this past week so I added a 2nd sentiment on this card :)

Building Blocks Card Fold Instructions:

To make this card fold, simply start with a piece of cardstock measuring 5.5" x 10.5". Score on the long side at 3.5" and 7". Fold to create one mountain fold and one valley fold.
To create the blocks, cut 1.5" in from the valley fold at the following measurements:
3/8", 1-5/8", 2-1/8", 3-3/8", 3-7/8" and 5-1/8".
Decorate each panel as you like!

Monday, 28 July 2014

A Mid-Summer Update and a Dinosaur Card-in-a-Box

Another month and a half has flown by! Summer is a busy time and seems to leave less time for crafting and more time for traveling and spending time outdoors. It's been a great summer so far. Just last month my parents came for a visit and we all went camping on beautiful Vancouver Island, touring around parts of Victoria - what an awesome trip! We've had some hot days here in Prince George, which I am not complaining about. I love the summer heat! However, along with the dry heat we've had some serious forest fires throughout B.C., which are still raging in some parts of B.C. One morning, not too long ago, there was a fire fairly close to Prince George, covering the city with thick smoke and a red haze, making it seem like night time until 10AM! 

A lot of changes will be coming up for my hubby and I. Not only are we expecting our first child in January, but we are also moving back to our home province of Ontario!! It's going to be a bitter-sweet move, as we have grown to love the beautiful scenery of BC, but we are stoked to be moving closer to family and friends, especially with a little one on the way! 

I have been crafting on occasion this summer, making birthday cards for family members, but also completing orders for friends and Etsy customers. Just recently, a friend asked me to make a pop-up baby shower card for her nephew's baby shower. She makes adorable baby items and needed a card to go along with her gift. I may have mentioned TC Creations before... Here's the picture of a blanket she made to use as inspiration:


I had to put my thinking cap on for this one! Since I have no dinosaur stamps, I thought it would be fun to make punch art characters. I did some Pinterest searching and found some great ideas. I created the characters using papercrafting blogs as inspiration and adding my own personal touch. Here's the finished product:


Adorable, right!? I just love how it turned out! The green dinosaur was inspired by Song of My Heart Stampers, the adorable baby dino was inspired by KB Papercraft, and the stegosaurus was inspired by Stamps 'n Jewels. I had to play with the sizing of each dinosaur by using smaller punched out shapes so that it would fit in the card-in-a-box. It was challenging, but so worth it! Each panel was layered with Early Espresso cardstock and Tempting Turquoise DSP. 


Thanks for stopping by! I hope to blog more often as time permits. I really miss it and can't wait to spend more time participating in card challenges and sharing my creations with you! 

Sunday, 4 May 2014

A Masculine Birthday Card

We celebrated another brother's birthday this past week! My older brother, Jason turned 30 something!
I always find it somewhat challenging to create masculine birthday cards. I started off with a unique layout - sketching my own by combining different layouts that I saw on Pinterest. Then I chose the colours. Brown and blue generally come to mind. This time I threw in a brighter accent colour. I added a mixture of texture, patterns and punched out images. Here's how it all came together:


Here's wishing Jason a great year ahead!

Card Ingredients:
Stamps: Happiest Birthday
Paper: Crumb Cake, Midnight Muse, Very Vanilla, Early Espresso, Well Worn DSP, Sweater Weather DSP, 2012-2014 In-Colour DSP, Neutrals DSP
Ink: Early Espresso
Tools: Circles nestabilities, Chevron punch, Square Lattice embossing folder, 1-1/4" Circle punch, 1" Circle punch
Accessories: Tangerine Tango Candy Dots

Saturday, 3 May 2014

A Super Mario Birthday Card

Just this past week, my brother-in-law, Victor, celebrated a birthday. From what I hear, one of his favourite past times was to play video games, in particular Super Mario. So I thought, wouldn't it be fun to create a punch art card with this video game character on it :)
I was inspired by a card I found on Pinterest (unfortunately the website link no longer exists) and made one of my own using punches and pieces of cardstock. 


I think it quite closely resembles Super Mario! It was a challenge trying to figure out which size punches / nestabilities would work for each part of the face, but I love how it turned out! I kept the remainder of the card super simple and just embossed the card front with an argyle design. 


Thanks for stopping by! Tomorrow I will share a second birthday card made for another brother's birthday this past week. 

Card Ingredients:
Paper: Early Espresso, Crumb Cake, Real Red, Blush Blossom, Basic Black, Tempting Turquoise, Whisper White
Ink: Pink Pirouette, Real Red (for sponging), Real Red marker
Tools: Circles nestabilities, Ovals nestabilities, 1-1/4" Circle punch, Scallop Circle punch, Small Oval punch, Argyle embossing folder

Saturday, 22 March 2014

A Tri-Fold Owl Birthday Card

A couple weeks ago, I posted a fun owl birthday card that I made for my niece (click here to see original post). My initial inspiration came from this adorable card. I loved it so much that I made a second card, this time using the tri-fold. I stuck with the same colour combo, covering each panel with patterned designer paper and randomly placing the punch art owls throughout the card. 


So fun, right? This card is sure to make anyone smile on their birthday! 


I am entering this clean and layered card in The Card Concept challenge this week:


Thanks for stopping by! Enjoy your weekend!

Card Ingredients:
Stamps: Remembering Your Birthday
Paper: Crumb Cake, Coastal Cabana, Real Red, Early Espresso, Whisper White, Basic Black, Bermuda Bay, Polka Dot Parade DSP, Fresh Prints DSP, Brights DSP, 2013-2015 In-Colour DSP
Ink: Bermuda Bay
Tools: Circles nestabilities, Scallop Circles nestabilities, Owl Builder punch, Petite Pennant Builder punch, Heart to Heart punch, Little Leaves sizzlit die
Accessories: Bakers twine

Monday, 17 March 2014

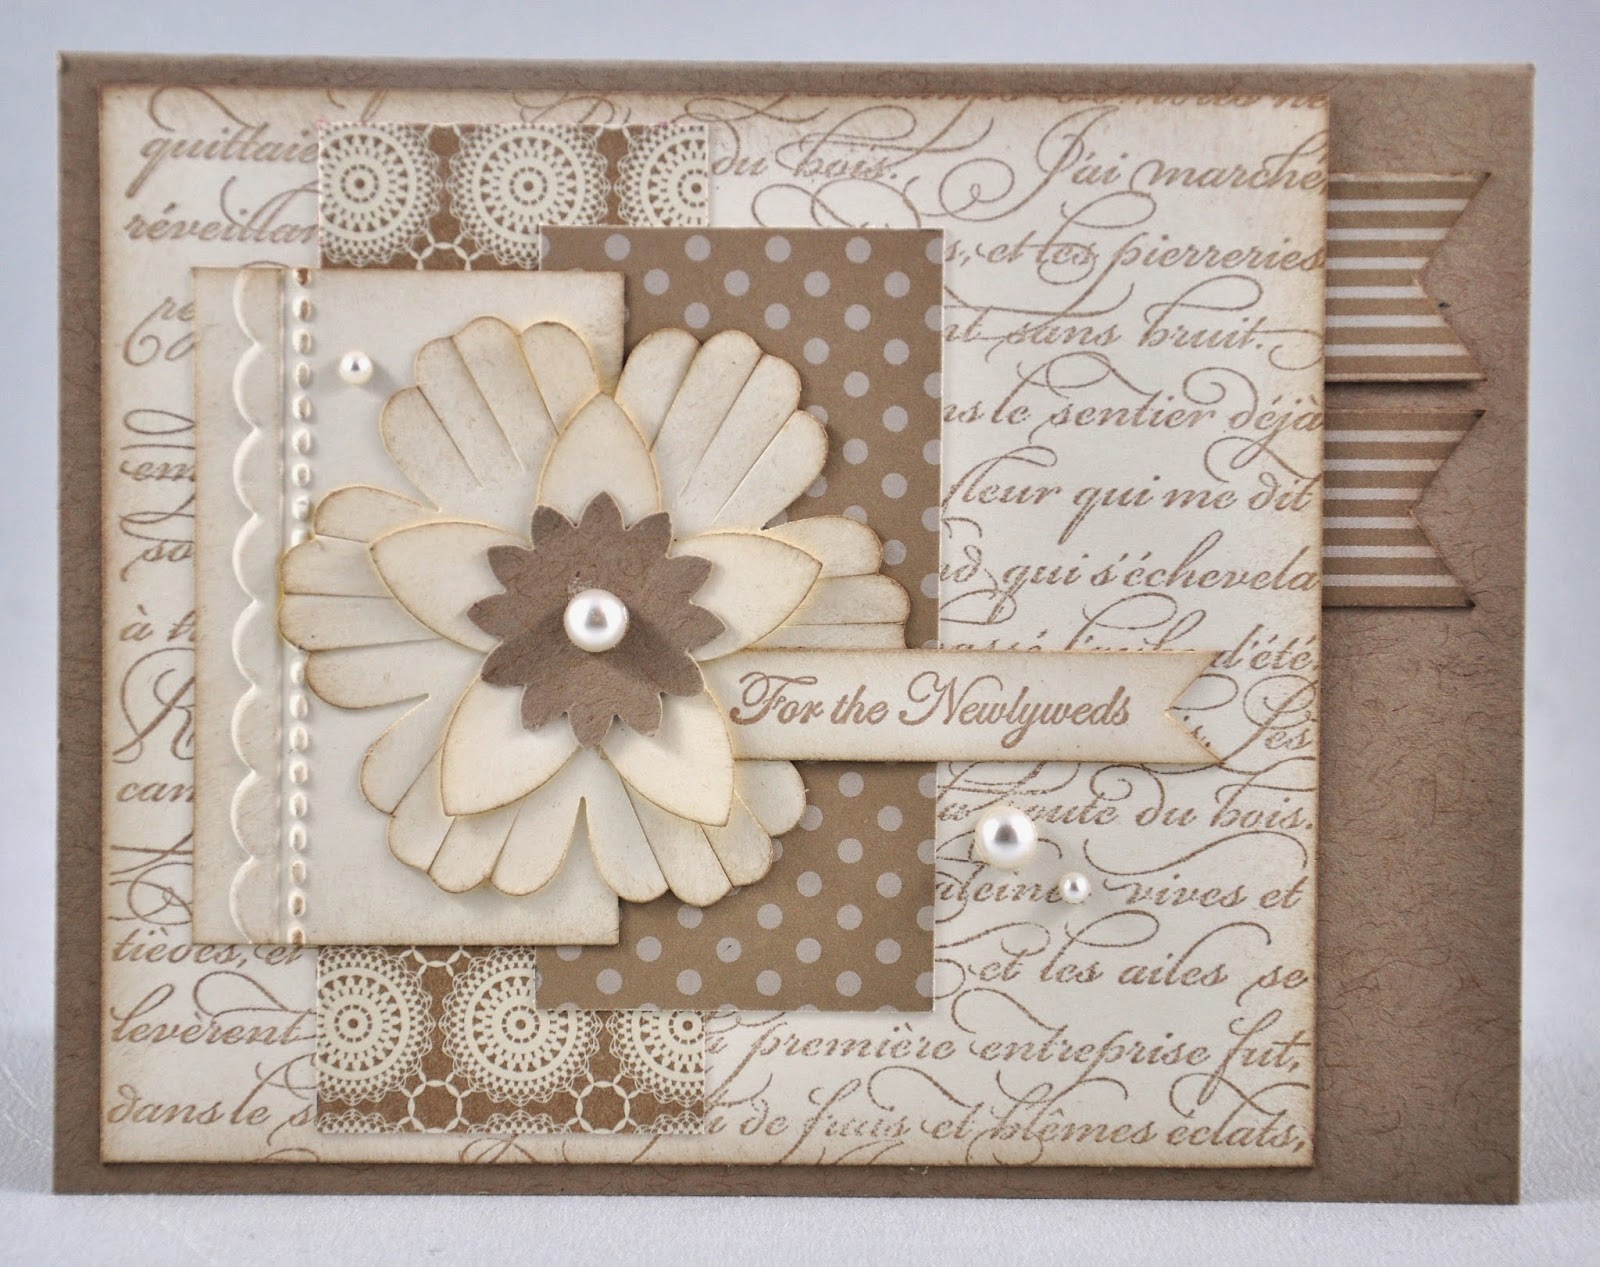
DS142 For the Newlyweds

It's hard to face another work week after a nice relaxing and productive weekend of visiting with friends, crossing things off the to-do list, enjoying the mild weather, and papercrafting! 

I've been working on quite a few wedding and bridal shower cards lately as I seem to be lacking those in my collection of cards. One of the wedding cards I made was inspired by the latest Deconstructed Sketch:


I LOVE the layers in this sketch! I decided to stick with a soft and subtle colour combo for this wedding card: Crumb Cake and Very Vanilla. Here's how it turned out:


I used the elegant French Script stamp for the background, and layered pieces of Crumb Cake designer paper on top. The top layer of Very Vanilla cardstock is embossed with a scallop stitched design. The edges of the punched out flowers and the sentiment are sponged with Crumb Cake ink to soften the look and pearls are added to embellish the card.


Thanks for stopping by! 

Card Ingredients:
Stamps: French Script background stamp, Teeny Tiny Wishes
Paper: Crumb Cake, Very Vanilla, Neutrals DSP
Ink: Crumb Cake
Tools: Needlepoint Border embossing folder, Blossom punch, Five Petal Flower punch, Boho Blossoms punch
Accessories: Pearls (Michael's)

Saturday, 17 August 2013

A 5th Year Anniversary!

Yesterday, Kevin and I celebrated our 5th year anniversary! (wow!) Can't believe how fast time flies. We have had so many awesome adventures over the past 5 years... I can't wait to see what the next 5 bring!

The night before our anniversary, Kevin surprised me with this absolutely gorgeous vase of flowers:


We recently saw purple wildflowers just like this one in Revelstoke, BC on the Meadows in the Sky Parkway and I absolutely loved them! They are so beautiful!

To celebrate we enjoyed a delicious dinner out at a local restaurant called North 54. They have the best ceasar salad we've ever tasted! We tried some lobster ravioli, garlic prawns, lobster tails, and topped it off with some wine and dessert (a white chocolate mousse cake, crème brule and a chocolate truffle) - yum!

It was a bit of a challenge to think of a unique design for my anniversary card this year. I  turned to a sketch from Mojo Monday this week as a guide (sketches always help!). I recently saw an idea on Splitcoast Stampers using the owl builder punch to create silhouette owls. I decided to CASE this idea and incorporate it into the Mojo Monday sketch and just love how it turned out!


How cute are those owls? I sponged Midnight Muse and Baja Breeze to make the night sky, and then sponged a 2nd circle with So Saffron ink to create the moon. The branch with leaves comes from the Bird Builder punch and the little hearts add a nice touch. The card front is embossed with stripes and burlap ribbon adds some texture to the card. Here's the Mojo sketch I used:


Thanks for looking!

Card Ingredients:
Stamps: Memorable Moments
Paper: Crumb Cake, So Saffron, Basic Black, Whisper White

Ink: Midnight Muse, Baja Breeze, So Saffron
Tools: Owl Builder punch, Bird Builder punch, Heart to Heart punch, Scallop Circle nestabilities, Circle nestabilities, 1-3/8" Circle punch
Accessories: Burlap ribbon (CTMH)

Thursday, 18 April 2013

100th Blog Post and a 'By the Tide' Masculine Card

Just realized this is my 100th blog post! Wow! Crazy how fast time flies... I love blogging. It has become a great addition to my hobby. Some days it can be hard to keep up with a daily blog (so this may change in the future to every other day, or something like that), but for now it works out great. I love participating in card challenges and blogging is a great way to do that. It really motivates me to build up my stock of cards/projects. Thanks to all my followers for reading my blurbs everyday! Hope you have been, and continue to be, inspired by my cards/projects! If you'd like to follow me on Pinterest, click here. I've created a board for all the cards I've posted in this blog.


For today's post, I created a masculine card using the new Sweet Sunday sketch. It's a great sketch with lots of layers!

 
I pulled out a new stamp set called "By the Tide". I love anything to do with the beach/ocean, so I just had to get this stamp set! I stamped the coral image in Crumb Cake and popped up a stamped fish that I cut out. Striped navy ribbon layers the bottom half of the card. I'm starting to love Midnight Muse -- it's a nice deep blue and is perfect for masculine cards!


I love how detailed the fish stamp is! It really stands out against the light Crumb Cake.


Thanks for stopping by! Make sure to come back tomorrow for a new KCRR challenge!
 
Card Ingredients:
Stamps: By the Tide, Teeny Tiny Wishes
Paper: Midnight Muse, Baja Breeze, Very Vanilla, Neutrals DSP
Ink: Midnight Muse, Crumb Cake
Tools: Circles Nestabilities, Owl Builder punch, Word Window punch
Accessories: Not Quite Navy striped grosgrain ribbon

Tuesday, 16 April 2013

Retro Sketch Challenge #59 {Happy I Do Day}

I was just thinking the other day about our upcoming road trip along the west coast. It's less than two months away! I have booked all the lodging and main events and created a day-to-day itinerary of all the things that we must see! It's going to be an awesome trip! This past weekend I booked a snorkeling tour in La Jolla Cove, California. I am especially excited for this since I've never snorkeled before! We get to see tiger sharks up close - how cool is that?!

For today's card, I decided to do something clean and simple, yet elegant. I got my inspiration from the Retro Sketches challenge this week. I love the simplicity of this sketch.


I decided to make an elegant wedding card using this sketch. The flowers reminded me of Stampin Up's flower trim ribbon and I thought they would fit perfectly in the design of my card. I used Crumb Cake and Very Vanilla colour combo. I don't like a lot of white space in my cards, so I decided to stamp the background with the French Filigree stamp -- perfect for a wedding card, I think!


Thanks for stopping by!
 
Card Ingredients:
Stamps: Word Play, French Filigree (ret.)
Paper: Very Vanilla, Crumb Cake
Ink: Crumb Cake
Accessories: Flower Trim Ribbon

Monday, 15 April 2013

Gift Tag Set with a Fabulous Colour Combo

What a productive weekend it has been! I made several Father's Day cards, mini baby cards, gift tags, birthday cards, gift card holders... I'm well on my way to being ready for the craft fair next weekend! Still hope to complete a few more projects this week. :)

For today's post, I will be sharing a set of gift tags that I made using the fabulous colour combo challenge from The Paper Players.


Isn't it lovely?? I drew inspiration from a card I made a while ago and converted it to a tag. Here's the original card:

 
I love the Bloomin' Marvelous stamp set! I may have over-used it already... but it's so pretty! I used Island Indigo designer paper and a scallop border on the one side of the tag and then stamped flowers, popping up one of them to give it some dimension. A humming bird is stamped in Rich Razzleberry and also popped up. I completed it with stitched ribbon.


See how easy it is to convert a greeting card to a set of tags? I'm definitely doing this more often with some of my other designs!
 
Thanks for visiting!
 
Gift Tag Ingredients:
Stamps: Bloomin' Marvelous
Paper: Whisper White, Crumb Cake, Summer Smooches DSP
Ink: Island Indigo, Baja Breeze, Rich Razzleberry
Tools: Scallop Tag Die, Scallop Border punch
Accessories: Rich Razzleberry stitched ribbon

Friday, 22 March 2013

KCRR #10 {From My Heart to Yours}

Happy Friday!

Not too long ago I heard about a craft show coming up at the end of April at a local elementary school. I've been going back and forth trying to decide if I should have a booth at this show. I did quite a few craft fairs last fall/winter and had a lot of fun doing them! On the other hand, it took a lot of time and effort to prepare for them. So after much thought, I decided to go ahead and participate in this one!  It's April 21st, so I have exactly one month to make as many handmade papercraft items as I can! My goal is to make a couple cards/projects each night during the work week and then approx. 20 items each weekend (if possible!). We don't have much planned between now and then so that will give me lots of time!

Time for a new card challenge with KCRR!


We picked two items this week and they complement each other quite well!

'P.S. I Love You' Stamp Set
Rose Red

Ok, so if you have seen this stamp set, you will know that it is related to Valentine's day. This was a challenge in itself, to try and find a way to use it without making it a Valentine's Day card (of course, there's no rules against making a Valentine's Day card!). I try to make cards for upcoming events or all occasions. The sentiments in this stamp set can work for Anniversary or Wedding or just a simple love card to give to that special person in your life. I decided to use the sentiment "from my heart to yours." I kept it clean and simple and added just a touch of Rose Red with the neutral colours.

I used a sketch from Viva La Verve Sketch Challenge as a guide.

 
And here's my card:
 
KCRR #10
 
I love the layout. I deviated a bit from the actual sketch and added a bit more detail The Rose Red sentiment and sponging on the hearts adds a splash of colour. I used burlap ribbon from Close to My Heart for the strip in the background. A doily cut out is sponged with Crumb Cake ink, as well as the edges of the card front. A pearl adds a perfect embellishment to the card.


Thanks for looking! Head on over to Karly's Creations to see her take on this challenge!
 
Card Ingredients:
Stamps: P.S. I Love You
Paper: Crumb Cake, Very Vanilla, Soft Suede
Ink: Crumb Cake, Rose Red
Tools: Delicate Doilies Sizzlit, Scallop Circle Punch, 1-1/4" Circle Punch, Heart to Heart punch
Accessories: Burlap Ribbon (CTMH), Pearl (Michael's)