Showing posts with label Ribbon. Show all posts

Tuesday, 28 May 2013

Papercraft Storage {Organizing Tools & Embellishments}

Along with enjoying the beautiful weather and doing some shopping, I spent a good part of my weekend organizing my craft area. Now that my paper is all nicely organized, I continued on with my tools and embellishments. This may be a bit of long post, as I wanted to combine tools and embellishments into one. Let's get started...

My ink pads are currently stacked on my crafting table. I have organized the piles by colour, like so:


My ink refills are placed in a box in one of the drawer organizer cubes from Michael's. I generally don't use these all that much, so I have them tucked away.


Someday, I would love to invest in the Stampin Up Colour Caddy. It holds up to 48 ink pads and ink refills can be put on top of the caddy. Even though it does take up some room on the table, it would be so handy!

I use sponging a lot on my papercraft projects, so I recently purchased the pack of 3 large round sponges from Stampin Up. I cut them in 8ths and using my tab punch, punched out tabs in different colours of cardstock and stapled them to the top of each sponge. I stuck them in a clear plastic tub that I bought at Michael's (they come in a pack of 3) and I have it sitting on my desk for easy access.


Moving on to my most favourite tool - punches! I have collected a lot of these over the years and they make papercrafting that much easier! In our apartment, we have ledges in every room. We've filled them with decor, books, etc. and in my crafting area they are perfect for my punches! I have lined them up in piles according to similar shapes. I have a section for the older style punches and a separate section for the newer style. Once we move, I'll have to make a shelf similar to this. It's nice to have them off the crafting table, but still in arms reach.


My sizzix dies are great for the more detailed papercrafting projects. I have them stored away in a 3-drawer organizer cube from Michael's.


Embossing folders are something I turn to quite often. They add that perfect texture to a greeting card or project. I have them stored in a greeting card box that I've recycled/reused. It fits them perfectly!


One day, when I have a bit more room, I'd like to have some type of storage unit with a table top just for my Big Shot, sizzix dies and embossing folders. Kind of a separate little station for any projects that require the Big Shot.

I have a lot of ribbon... more than I know what to do with! I did some research and came up with a fairly good way to organize my ribbon. I found an old pant suit hanger from our closet and hung it from a nail on the wall right beside my crafting table. It fits my spools of ribbon perfectly. For extra ribbon, I bought a basket (with holes in it) and bamboo sticks from the dollar store. You simply put the spools of ribbon on the bamboo stick and put it through the basket and then feed the ribbon through the holes. A picture may better illustrate what I am trying to explain:


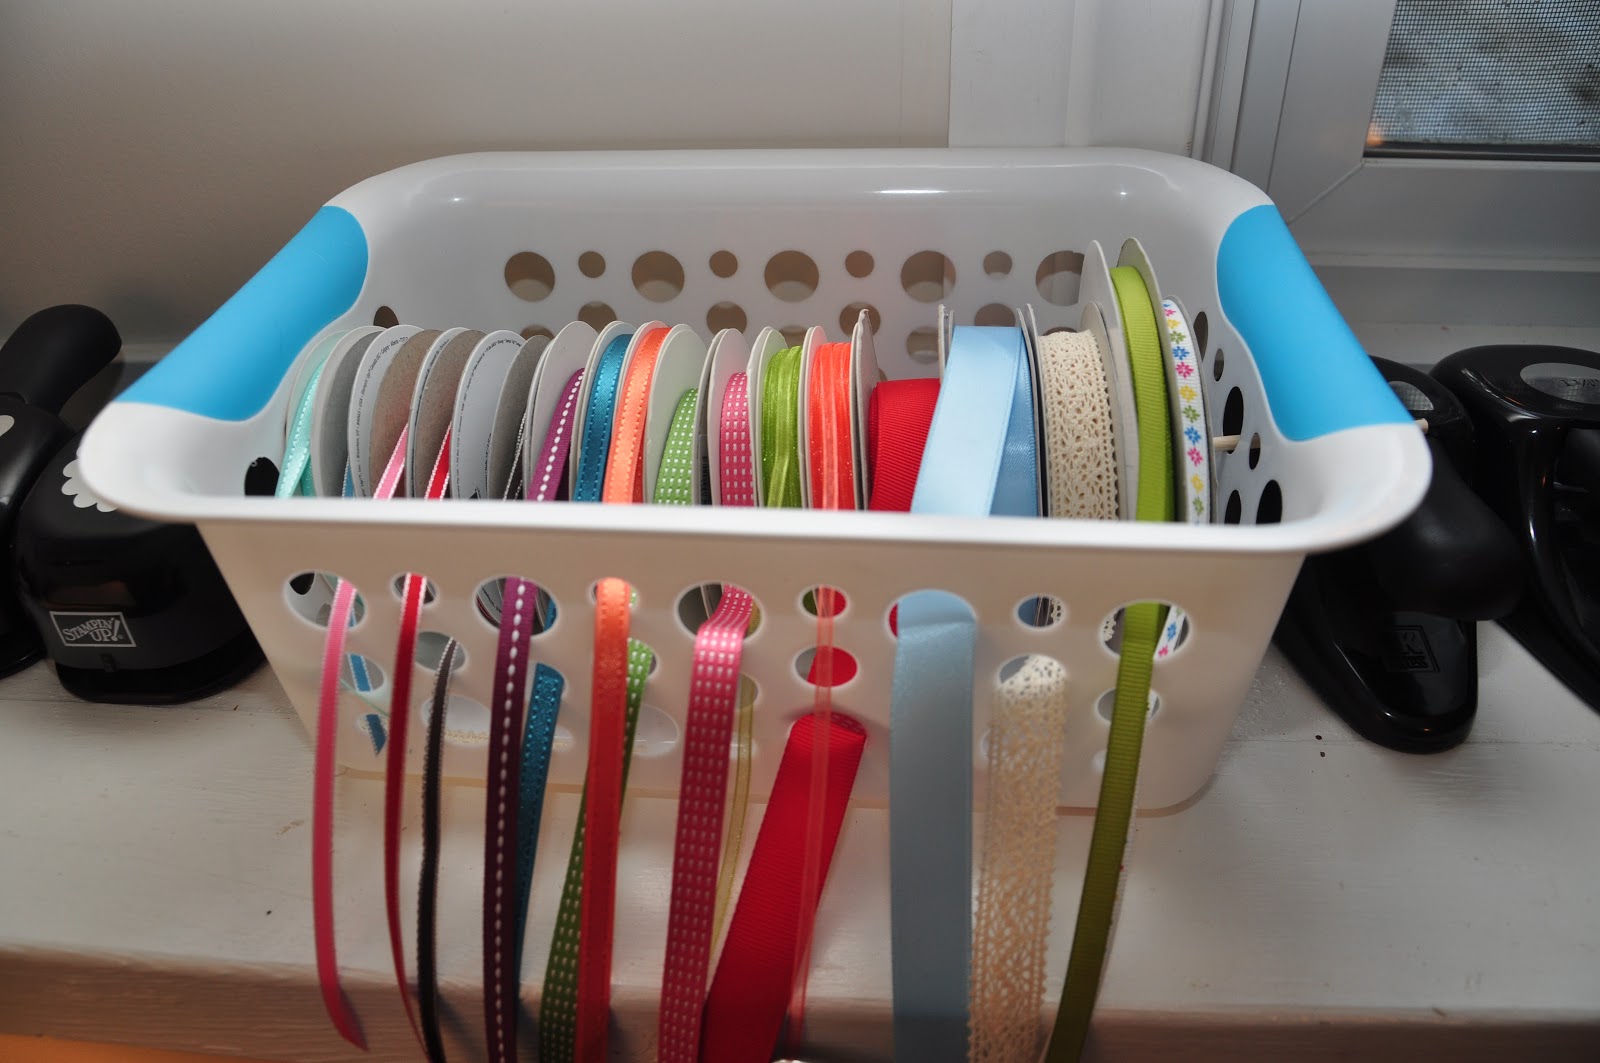
This works out great! While it does not fit ALL of my ribbon spools (yes, I have more!), it works for the ribbon that I use the most. The rest of my ribbon spools are put in the drawer of one of my organizer cubes and scraps of ribbon are put in a plastic tub

Along with a lot of ribbon, I also have quite a few buttons and brads.They do come in a handy little tub from Stampin Up, however, I wanted to have them all in one place. So I went to the dollar store and picked up plastic storage cubes that are meant for holding nuts, bolts, nails, screws... They fit my small embellishments perfectly!


Thanks for stopping by! If you have any questions/suggestions/comments feel free to leave a comment below!

Thursday, 4 April 2013

PP139 Tic-Tac-Toe Challenge {Set of Gift Tags}

Even though the work days seem long, it feels like this week is flying by! Last night I came home feeling exhausted... not sure why. I think my body is telling me that I need more sleep! It took a alot of effort to go to Zumba Fitness. I just wanted to stay home and craft and then go to bed early. But, I'm glad I went. It woke me up a bit and made me feel a little more energized. It's a new session and I think it's going to be a good one! The routines were a bit challenging, but I think after a couple more classes I should be able to catch on!

I played along with the Paper Players challenge for today's post. It's a tic-tac-toe challenge! How fun is that?!


SO many choices! I knew for sure that I wanted to make gift tags and I love using ribbon and pearls on my paper craft projects, so I went with ribbon, a tag and pearls. I love working with sketches, but this time I looked through my past card creations and used one of them for inspiration. I love the colour combo of this card I created back in beginning of February and decided to convert it to a gift tag.

 
It's a fairly simple design as I wanted the stamped flower image to stand out. I added a pearl as an embellishment in the center of the flower and tied Tangerine Tango satin ribbon through the hole at the top of the tag. Stampin Royalty's challenge this week happens to be "Ribbon and Pearls". So I decided to enter this project in their challenge as well. I made a set of 6 identical tags:


Thanks for stopping by!

Card Ingredients:
Stamps: Madison Avenue
Paper: Whisper White, Rich Razzleberry, Summer Smooches DSP
Ink: Rich Razzleberry, Tangerine Tango
Tools: 1/4" Circle Punch, Circles Nestabilities, Scallop Circles Nestabilities, Scallop Tag Die
Accessories: Pearl (Michael's), Tangerine Tango satin ribbon (Sale-A-Bration)

Thursday, 21 March 2013

Sweet as Honey

We are over the midweek hump... that much closer to the weekend! It's been a busy week so far. I'm completing a lot of unfinished tasks at work - feels great to cross things off the list!
Last night I cooked a delicious dinner of salmon, garlic quinoa with parmesan, and veggies. The salmon was baked in soy sauce, a pinch of cinnamon, nutmeg and pepper, and lemon juice. It was not bad.. a little bland. I think next time I'll try a tastier marinade. The quinoa was delicious though! For the recipe, click here. It has to be my favourite quinoa recipe so far!

For today's card, I played along with a colour combo from Dynamic Duos and a fabulous sketch from Paper Players.


When I saw the Dynamic Duos colour combos this week, I thought of honeybees! I recently bought a stamp set from Close to My Heart called "Honeycomb" - I love it! I used hexagons in place of the squares in the sketch and added the sentiment "sweet as honey". A strip of black striped designer paper is punched with the scalloped border. I added So Saffron grosgrain ribbon for the 'dessert option'. To complete the card, I stamped a bee from the "Bugs and Hugs" stamp set, fussy cut it, and popped it up using dimensionals.


Thanks for looking! Make sure to stop by tomorrow for a new KCRR challenge!
 
Card Ingredients:
 
Stamps: Bugs and Hugs (CTMH), Honeycomb (CTMH)
Paper: Whisper White, Neutrals DSP
Ink: So Saffron, Staz-on Black
Tools: Scallop Border punch
Accessories: So Saffron grosgrain ribbon (ret.)


Sunday, 3 March 2013

Freshly Made Sketches #75

Yesterday was PJ day for me :) Stayed in my PJ's till about 3:30PM, believe it or not! In all that time I did some laundry, house cleaning, skype calling, papercraft organizing and more trip planning. I pretty much completed our road trip itinerary. Still need to do some tweeking, but managed to include most of the top sites we want to see! A few things I'm super excited about -- swimming with dolphins, snorkeling at La Jolla Cove and sun bathing on the California beaches!

One of the highlights to my day was receiving an email from my hubby! He's safe and sound on the boat in QCI! It was so good to hear from him. I miss him so much!

Another highlight -- a fun skype call with my Mom and sister, Esther. Wish I could be there to hang out with them...


Today's card was based on the Freshly Made Sketches challenge this week:

 
At first glance, I thought this was too clean and simple for my taste. But then I brainstormed what I could use for the big open space. I was inspired by Jennifer Brum's card and thought of the poppies paper from the Floral District collection. I added some pleated ribbon and the sentiment "happy mother's day" and this is how it turned out:


While Mother's Day is still a couple months away, I thought I'd get a good head start on some cards for my Etsy Shop. I added dimension to some of the flowers by punching out circles from the same paper and popping them up with dimensionals.


Thanks for stopping by!
 
Card Ingredients:
 
Stamps: Teeny Tiny Wishes
Paper: Tangerine Tango, Whisper White, Floral District DSP
Ink: Tangerine Tango
Tools: 1-3/8" Circle punch
Accessories: Pleated Lucky Limeade Ribbon

Tuesday, 12 February 2013

Mojo 280 {Get Well Wishes}

Well, it's back to work after a great 3-day weekend! I was able to enjoy beautiful sunny weather and catch up with some family members. I also crossed a lot of things off my to-do list, including a handmade V-Day gift for my hubby (to be posted on Thursday!) It will be hard to get up for work tomorrow...

Today's card was inspired by Mojo Monday's sketch:

 
I wasn't too sure what occasion to use for this card, and then I thought of my Mom asking me for a "get well soon" card for her friend. Her closest friend went through a serious back surgery, where they put rods in her back. She is doing well, but it will be a long recovery. I wanted to use soft and subtle colours, yet somewhat cheerful, so I went through my designer series paper and came across "Attic Boutique" DSP. I also chose an elegant, yet simple, flower stamp to use as the main focus of the card. Here is my interpretation of this sketch:

 
I embossed the Pool Party cardstock with a vine design and added Soft Suede taffeta ribbon. The sentiment "get well wishes" is popped up using dimensionals. I've added pearls to embellish the card.


Card Ingredients:
 
Stamps: Love & Sympathy, Teeny Tiny Wishes
Paper: Soft Suede, Pool Party, Very Vanilla, Attic Boutique DSP, Brights DSP
Ink: Soft Suede
Tools: Scallop Border punch, Word Window punch, Vine embossing folder (Cuttlebug)
Accessories: Soft Suede taffeta ribbon, pearls (Michael's)
 
Thanks for stopping by!

Wednesday, 30 January 2013

Birthday Wishes for my Mother

Today is another special day - my Mom's birthday! Here's wishing her a fantastic day! She is an amazing Mom, so sweet and caring. She has such a big heart. I miss her!


Because I couldn't be home to celebrate her special day, I sent her a little something to let her know I'm thinking of her.

My mom loves to sew and she is so good at it! I am so grateful for all the hems she's mended, all the holes she's patched and all the alterations she's made. Whatever sewing task it was she was able to do it!
Sooo... I found inspiration on pinterest and decided to CASE a sewing-related card!


Isn't it awesome?? It's the perfect card for my Mom :) I think she's going to love it!
To see the original idea that I found on pinterest, visit Stamped Creations By Heather.

The card itself is a spool of thread (in this case, I wrapped ribbon around it). I embossed the card base with a woodgrain design. The scissors are created using a template that I found on the blog mentioned above. The handles of the scissors are put together by a small silver brad and they actually 'cut' like real scissors! They are clipped on with a small 'library clip'. I then added buttons to a piece of cardstock and pinned them on with a small clothespin. Last, but not least, I added the sentiment "happy birthday" and flagged the edges to complete the card.


To add to this great card, I decorated a greeting card box and filled it with 10 greeting cards. She is often asking me to send her greeting cards to give away to family and friends, so I thought I'd get her started to have some on hand :)

 
The original box is from Close to my Heart. It's meant to be a photo box, but I think it works great for holding greeting cards!
I used a combination of Comfort Cafe DSP and Sycamore Street DSP to decorate the box. The rose is created with the ornament punch and Island Indigo cardstock. The letters are cut using my cricut machine. I added pearls on the front to embellish it.
 
I hope she is pleasantly surprised with this package of goodies in the mail! :)
 
Thanks for visiting!


Monday, 28 January 2013

Love You a Latte!

Good morning!

What a great weekend it was! Went by way too quickly (as usual). Feels like it may be a long Monday -- so tired!

Today I'm playing along with The Paper Players challenge. It's another great sketch challenge this week. Simple, yet very versatile! Here is the sketch:


I decided to create a fun Valentine card. I started with choosing the designer paper. More Amore DSP collection has such a great selection of beautiful designs. I then pulled out a retired stamp set that I've loved ever since I bought it - Pun Fun! Here's the card design I came up with:


The Very Vanilla cardstock is embossed with Elegant Lines embossing folder (one of my favourites!) I stamped the "Love you a latte!" image in Real Red and layered it on a large scallop circle, which is popped up using dimensionals. Small rhinestones embellish the stamped image. I added Primrose Petals stitched satin ribbon to complete the card.


Card Ingredients:

Stamps: Pun Fun (ret.)
Paper: Real Red, Very Vanilla, More Amore DSP
Ink: Real Red
Tools: Circle Nestabilities, Scallop Circle Nestabilities, Elegant Lines embossing folder
Accessories: Rhinestones, Primrose Petals stitched satin ribbon

Thanks for stopping by!


Sunday, 27 January 2013

A Special Birthday and Retro Sketches Challenge

It's a special day today! My hubby turns 29! Wishing him a very Happy Birthday! He is an amazing husband and I don't know what I would do without him! Looking forward to some awesome adventures with him this year!


I will post the card I made for him later today (after he's seen it) :)

Now for a new Retro Sketches challenge!


At first glance, I found this to be quite a challenging sketch. But after looking at the designers' cards, I was inspired! I needed to find a sentiment that would be large enough to fit the white space as shown in the sketch. I had a look through my stamps and came across a hostess set that I absolutely love but have not used enough -- "Carry On". This is what I came up with:

 
I generally make cards the regular A2 size, but wanted to try something different this time! I decided to create a 5" x 5" square card with a matching envelope. I added strips of Summer Smooches designer paper and embossed the Tangerine Tango cardstock with a chevron pattern. The "AND" in the sentiment is popped up using dimensionals. A button, satin ribbon and bakers twine embellish the card.


Card Ingredients:

Stamps: Carry On (hostess)
Paper: Real Red, Daffodil Delight, Tangerine Tango, Early Espresso, Whisper White, Very Vanilla, Summer Smooches DSP
Ink: Early Espresso
Tools: Cupcake Builder punch, Word Window punch
Accessories: Chevron embossing folder, Perfect Polka Dots embossing folder, button (Sale-a-Bration), bakers twine, satin ribbon (Sale-a-Bration)

Thanks for visiting! Enjoy your Sunday! 


Thursday, 24 January 2013

Loads of Love

Last night was a busy night... Did some grocery shopping, cooked a delicious tuna casserole for dinner, went off to Zumba fitness and of course, fit in some papercrafting! It was the first Zumba class of the year and it felt so good to be back at it again! It was a different routine, so I may have been fumbling around trying to follow along, but after a couple more classes, I think I'll have the moves down :) I've been going to Zumba for the past year and a half and I absolutely love it! While I may not be very coordinated and don't have the greatest dance moves, Zumba gives me a great workout, makes me feel energized... and it's fun! Afterwards, it was nice to wind down and spend some quality time with my crafting supplies :)

Freshly Made Sketches came with out a nice clean and simple sketch this week. I'm starting to get used to these clean and simple designs and tried my best to keep my card clean and simple for this challenge. Here's the sketch:

I found this sketch to be very versatile! Just about any image can be used in place of the butterfly. I almost had a hard time making a choice between a few stamp sets! But I decided to pull out a retired stamp set that I hadn't used in awhile - Loads of Love! This stamp set (along with Loads of Love Accessories) is so fun! There are so many different occasions you could use it for. I chose to make another Valentine's card:


I love the pile of hearts in the back of the pick-up! I used a blender pen to colour in the truck and hearts. It's a great technique of making it look somewhat like watercolour. I used More Amore DSP for the card front and embossed a strip of Basic Gray cardstock with the Fancy Fan embossing folder (one of my new favourites!) The scallop edge border gives the card a little bit of detail. I stamped "Loads of Love" on a tag shape and added Primrose Petals stitched satin ribbon to embellish it.


Card Ingredients:

Stamps: Loads of Love (ret.)
Paper: Pool Party, Primrose Petals (In Colour), Real Red, Basic Gray, Whisper White, More Amore DSP
Ink: Real Red, Basic Gray, Regal Rose, Basic Black marker
Tools: Blender pen, Large Tag Punch, Extra-Large Tag Punch, Scallop Edge Border Punch, Fancy Fan Embossing Folder
Accessories: Primrose Petals Stitched Satin ribbon

Thanks for stopping by!

Monday, 21 January 2013

From my heart to yours.

It's Monday morning and it feels like the weekend just flew by! I'm so not ready to go back to work this morning! I'm lacking motivation.. I think it's the winter blues...

I combined another two challenges for my
card today -- a card sketch from Pal's Paper Arts and a colour challenge from Dynamic Duos.


I love this card sketch and was so excited to create a card with it! The dessert option for Dynamic Duos is a Valentine Theme. Perfect! I love making Valentine cards :) At first I wasn't sure about using black in my card. When I think of Valentine's, I think of red, pink, white... not black. So, I made the black a very subtle colour in my card... this is how it turned out:

For the background, I used the transparent designer paper from the Candlelight Specialty DSP. It has a felt embossed design on it and I think it's simply elegant! I embossed the Whisper White cardstock with the Vintage Wallpaper embossing folder and it seems to match perfectly! I then wrapped Real Red grosgrain ribbon around the card front. The delicate doilies add to the elegance of this card. I added hearts in white and red.  Small rhinestones embellish the card. The sentiment is stamped in Basic Black and I sponged the edges of the white hearts and doily with Basic Black ink.
 

What do you think of using black as a valentine colour?

Card Ingredients:

Stamps: P.S. I Love You (ret.)
Paper: Real Red, Basic Black, Whisper White, Candlelight Specialty DSP (Holiday Mini 2012)
Ink: Basic Black
Tools: Delicate Doilies Sizzlits Die, Heart to Heart punch
Accessories: Rhinestones

Thanks for stopping by! Enjoy your Monday!