Showing posts with label Word Play. Show all posts

Tuesday, 30 July 2013

So Worth the Wait x2

Monday was one crazy busy day! So glad it's over! However, I have a feeling this whole week is going to be super busy. That just means my vacation next week will feel all the more rewarding!

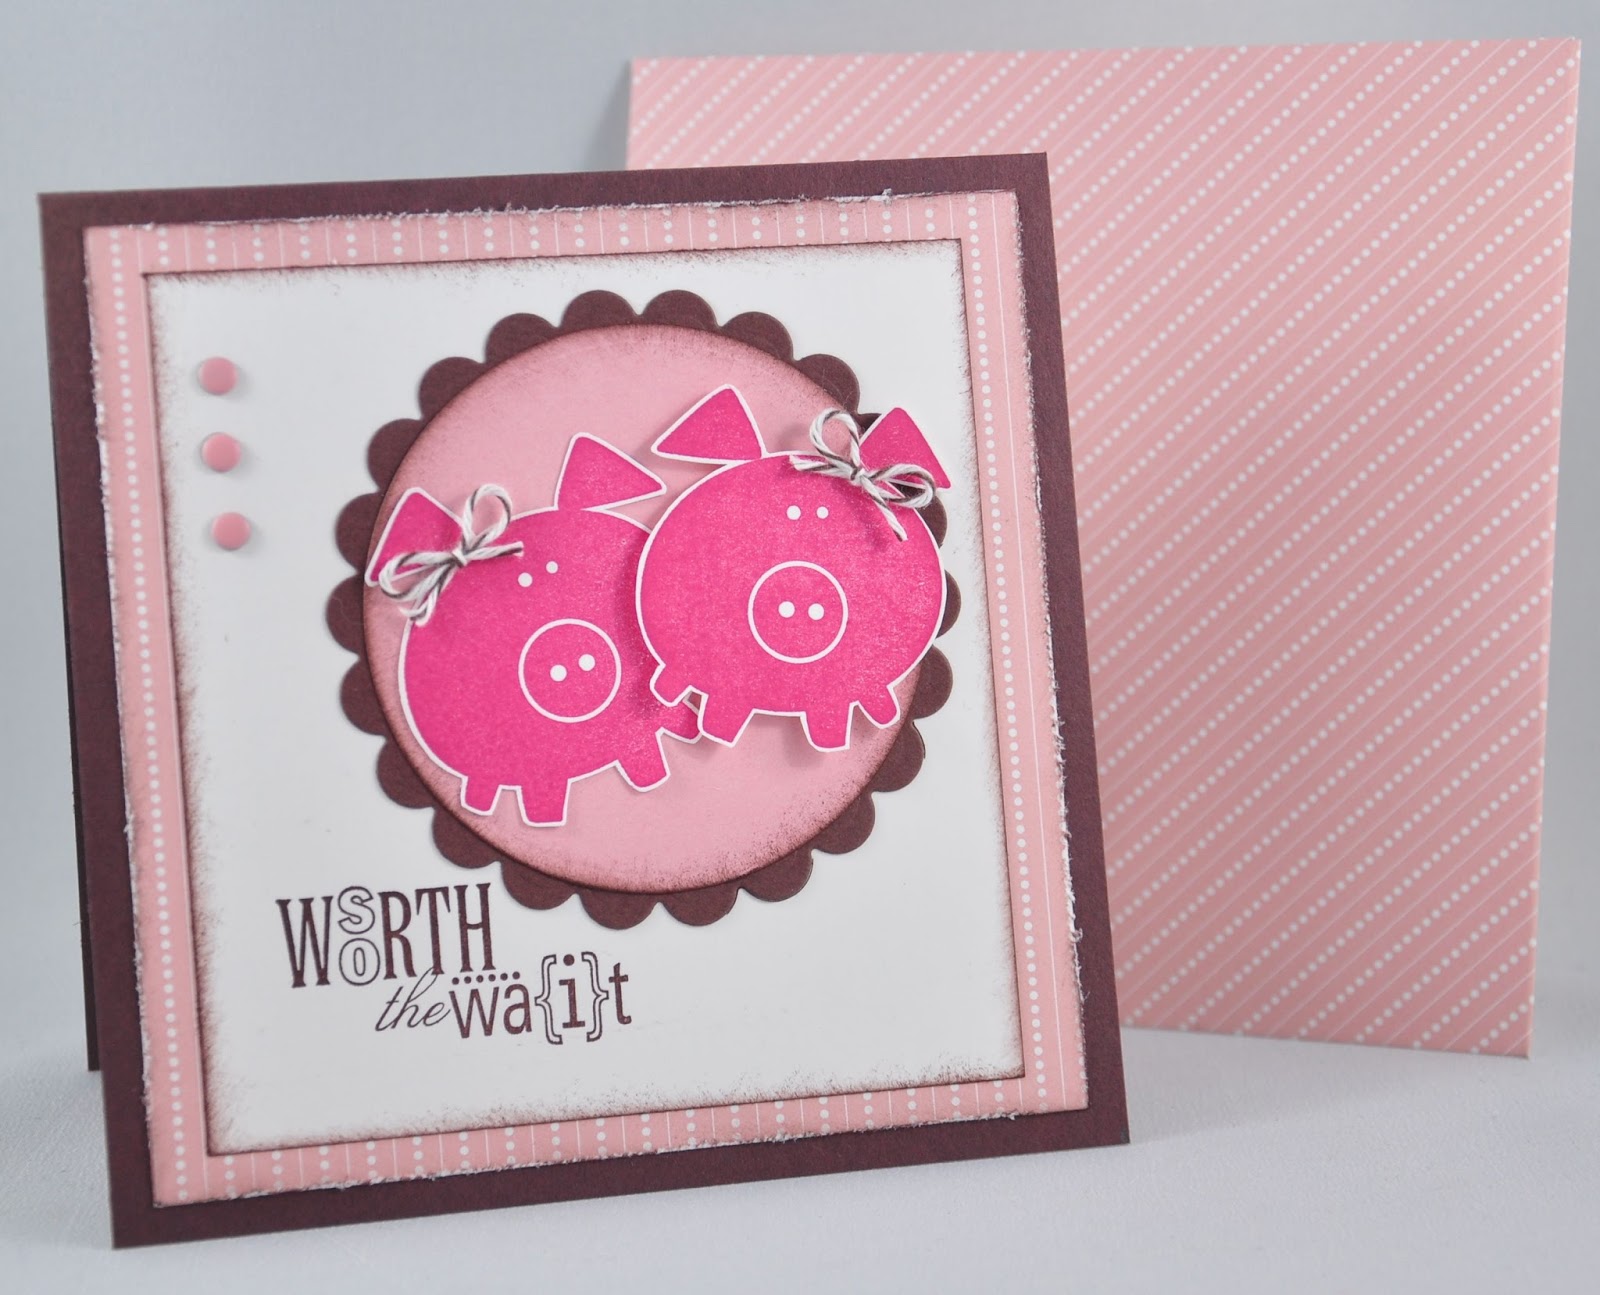
I had a request from a friend to make a 'congratulations' card for twin baby girls. It took me a bit to think of a design, and then I remembered a card I made a while ago using the cute little pig from Button Buddies and the sentiment "So Worth the Wait" from Word Play. Click here for the original post. I decided to remake this card, adding another piggy for the twin girls. I used similar designer paper and the same colour combo.


As I did in my original design, I added little bows to each piggy. And instead of buttons, I added candy dots to embellish the card. (I love that Stampin Up came out with these new candy dots! I know I will be using them a lot!)

 
I added a strip of DSP on the inside of the card for an added touch. I love the idea of decorating the inside of the card and I think I may do this more often, even if it is just as simple as adding a strip of DSP.


Since this is a 5" x 5" greeting card, I needed to make an envelope for it. So, being that I love to match things, I used the same DSP that is on the card for the envelope as well.
 
This is one of my favourite baby cards!
 
Card Ingredients:
Stamps: Button Buddies, Word Play
Paper: Chocolate Chip, Whisper White, Blushing Bride, Nursery Nest DSP
Ink: Rose Red, Chocolate Chip
Tools: Circles Nestabilities, Scallop Circles nestabilities, Distress tool
Accessories: Blushing Bride candy dots, Early Espresso bakers twine

Tuesday, 21 May 2013

A Barkerville Experience and a Graduation Card

It's nice to get back into cardmaking/blogging after a bit of a break. This past weekend was a catch-up weekend for me, for the most part. I spent most of Saturday finalizing our road trip plans, making some changes to our itinerary so we can stay one night in Vegas (can't wait!). I then spent some time sorting through older pictures from 2007/2008 that I still want to scrapbook (I have close to 200 photos from those years that I want to scrapbook!). I look forward to getting back into scrapbooking again and hope to add some variety to my blog posts in the near future.
On the holiday Monday (Victoria Day in Canada), my husband and I decided to take a day trip to a historic town called Barkerville. At first we weren't sure if we should go, as there was rain forecasted for most of the day. However, I'm glad we did! It was cloudy, but didn't rain until we drove home! Barkerville was B.C.'s gold rush town back in the 1860's. It was a really neat experience! They have actors all dressed up walking around town and putting on presentations. We got to experience a court session and a morning prayer service in the Anglican church, watch a blacksmith at work, enjoy the most delicious Chinese food ever, take part in a fun photo shoot and watch an entertaining presentation on gold mining. Also, 'Queen Victoria' was in town for the holiday. We missed the afternoon tea, but got to see her ride in on the stagecoach. Here are a few pictures so you can have an idea of what it was like:


For today's post I wanted to play along with Mojo Monday's new sketch of the week, as well as a theme challenge with The Pink Elephant.


This week we are challenging you with a
"Graduation Theme"
(You can create a card, layout, or project featuring a "Graduation Theme")

This sketch is simple and versatile! I will probably use it more often. I've been wanting to use a stamp from the "Word Play" stamp set that would be perfect for a graduation card. Here's what I came up with:

 
I chose Midnight Muse, Gumball Green, Crumb Cake and Whisper White for the colour combo and I think they go really well together! I used designer paper from the Print Poetry DSP stack and matted it with cardstock. The square lattice embossed strip of Crumb Cake adds some nice texture to the card. The arrow in the sentiment was stamped in Gumball Green and I fussy-cut it out, then popped it up to give the card some dimension. Silver brads and stitched satin ribbon embellish the card.


Thanks for stopping by! Hope you also had an enjoyable weekend!
 

Card Ingredients:
Stamps: Word Play
Paper: Midnight Muse, Crumb Cake, Whisper White, Gumball Green
Ink: Midnight Muse
Tools: Scallop Border punch, Corner Rounder punch, Square Lattice embossing folder
Accessories: Gumball Green stitched satin ribbon, silver brads (Michael's)


Tuesday, 14 May 2013

Friday Mashup #109 {A Matching Set!}

Last night I tried a new recipe that I found on Pinterest (if you haven't already, join Pinterest! They have some awesome ideas on crafting of all kinds, household tips, fashion, and food!). This one is called Meatloaf Muffins. Click here to see the recipe. They were absolutely delicious! I used moose hamburger instead of beef and combined the meat with some veggies, spices, bbq sauce and salsa and used an ice cream scoop to scoop them into the muffin pan. I will definitely be doing this again! It's a great alternative to chicken and pork and goes well with mashed potatoes and veggies!

I also spent some time crafting last night. It feels like it's been a while since I spent that much time in my craft area lately! It was kind of nice to get back into it again, although I struggled a bit with design/creativity last night so my project took a little longer than I wanted it to. But in any case, I decided to play along with the Friday Mashup challenge. It's a good one this week!

  1. Create a project using "the sketch".
  2. Create a "set of cards".
  3. Or Mash it Up and create a "set of cards using the sketch".
The designer this week created a tutorial to make a matching DSP card set.(what a great idea!). I picked Summer Smooches designer paper and after following her tutorial, here is what I came up with:

 
I love the bright colours of this DSP! It really speaks for itself, so I kept the cards pretty clean and simple. I used some of the sentiments from the stamp set "Word Play" as the central image in each card, and then embellished the cards with ribbon, rhinestones, etc. Here are some close-ups of the cards: 


Thanks for stopping by!
 
Card Ingredients:
Stamps: Word Play
Paper: Island Indigo, Rich Razzleberry, Pool Party, Whisper White, Summer Smooches DSP
Ink: Island Indigo, Rich Razzleberry
Tools: 1-3/8" Circle punch, Scallop Circle punch, Extra-Large Oval punch, Oval Embossing Folder, 1" Square punch, Beautiful Wings Embosslit Die
Accessories: Satin ribbon, Rhinestones (Michael's), Button, Linen Thread

Tuesday, 16 April 2013

Retro Sketch Challenge #59 {Happy I Do Day}

I was just thinking the other day about our upcoming road trip along the west coast. It's less than two months away! I have booked all the lodging and main events and created a day-to-day itinerary of all the things that we must see! It's going to be an awesome trip! This past weekend I booked a snorkeling tour in La Jolla Cove, California. I am especially excited for this since I've never snorkeled before! We get to see tiger sharks up close - how cool is that?!

For today's card, I decided to do something clean and simple, yet elegant. I got my inspiration from the Retro Sketches challenge this week. I love the simplicity of this sketch.


I decided to make an elegant wedding card using this sketch. The flowers reminded me of Stampin Up's flower trim ribbon and I thought they would fit perfectly in the design of my card. I used Crumb Cake and Very Vanilla colour combo. I don't like a lot of white space in my cards, so I decided to stamp the background with the French Filigree stamp -- perfect for a wedding card, I think!


Thanks for stopping by!
 
Card Ingredients:
Stamps: Word Play, French Filigree (ret.)
Paper: Very Vanilla, Crumb Cake
Ink: Crumb Cake
Accessories: Flower Trim Ribbon

Wednesday, 20 March 2013

Thanks a Million

Happy First Day of Spring!

It may not seem like spring has sprung, but it's good to know that we are getting that much closer! Now if only the mountains of snow in PG would start to melt... I have a feeling it may be a while before we see some green grass... Even though it feels like winter, the sun is still shining! Here's a picture I took on my way to work yesterday morning:


I realized today that one of my cards was picked as one of the top 3 for the Stampin Up Only challenge "Going Green"! How exciting! To see my original post, click here.


Now onto today's card! I played along with the Deconstructed Sketch and Fab Friday challenges. The sketch is a clean and simple one this week and the colour combo is perfect for spring.


 I combined these two challenges to make a thank you card. I used patterned designer paper, embossed cardstock, and ribbon as an embellishment. The sentiment is from Stampin Up's 'Word Play' stamp set. I think it's perfect for this clean and simple card and really stands out against the soft spring colours!


Thanks for stopping by! 

Card Ingredients:

Stamps: Word Play
Paper: Sahara Sand, Calypso Coral, Whisper White, In-Colour 2011-2013 DSP, Subtles DSP
Ink: Staz-On Black ink
Tools: Vine Street embossing folder; Eyelet border punch
Accessories: Lucky Limeade ribbon (Sale-a-bration ret.)

Wednesday, 6 March 2013

A Perfect Sketch and a Fabulous Colour Combo

The past few nights have been quite cold in PG, making it take a little longer to warm up during the day. It doesn't feel like Spring is on it's way... I guess, technically, the first day of Spring isn't until March 20th. But, now is the time of year I get cabin fever and really want the seasons to change. I look forward to the snow melting, flowers blooming, opening windows to let the smell of fresh spring air fill the apartment, warmer nights for going on walks... ahh I can't wait!

Today's card combines a perfect sketch challenge from Deconstructed Jen and a fantastic colour combo from Colour Q.


I just LOVE this colour combo. I think the colours coordinate so well together. And the sketch is a perfect example of a combination of clean and simple with layers. Here's what I came up with:

 
I love how clean and simple this card is. I added detail by using different patterned designer paper and embossed cardstock. I wanted to deviate away from creating another birthday card, so I chose a fun sentiment from the Stampin Up 'Word Play' stamp set. I simply stamped it in Cherry Cobbler ink, punched it out with the Extra Large Oval punch and sponged the edges. I added rhinestones to complete the card.


Thanks for stopping by!
 
Card Ingredients:
 
Stamps: Word Play
Paper: Crumb Cake, Cherry Cobbler, Whisper White, 2011-2013 In-Colour DSP, Regals DSP, Floral District DSP
Ink: Cherry Cobbler
Tools: Extra Large Oval punch, Square Lattice Embossing Folder
Accessories: Rhinestones (Michael's)

Wednesday, 20 February 2013

Dynamic Duos {Wish Big}

My "Monday" carried over into Tuesday morning when I went to take a shower and discovered there was no hot water. Showers are what wake me up in the mornings, so I braved the freezing cold water and while it wasn't pleasant, it certainly did wake me up! Not a great way to start my morning though! I can tell this is going to be a long week... Tuesday was a long work day, but I made the most of my evening. I came home to a new issue of Papercrafts Magazine in my mailbox! I got the subscription to this magazine as a Christmas present from my Dad - what a great gift!

There are lots of inspiring ideas in this issue! It's all about baby cards and weddings - a perfect Spring issue! I will definitely be using some of the layouts and tips in my upcoming card creations.
To complete my evening I created a couple cards, watched some tv and made a delicious apple crisp, which made the apartment smell so good!

For today's card I played along with the Dynamic Duos colour challenge:

I went all in for this challenge and decided to incorporate the dessert option into my card as well. I don't have any cloud stamps, so I turned to using punches. Here's what I came up with:


It's a very simple card, but so adorable (in my opinion!) I used Basic Black for the card base. The card front represents sky. I used the cupcake builder punch to create the clouds. They are lightly sponged with Tempting Turquoise ink. A hot air balloon is created using a circle punch for the balloon and the cupcake builder punch for the basket.  The balloon is 3D - it pops out of the card, but folds flat so it can go into an envelope (cool technique!). I stamped and cut out the cute little monkey and stuck him in the basket. The sentiment was stamped in Basic Black, but unfortunately, my Basic Black ink is running dry, so it didn't quite stamp as solid as I would have liked. I actually like the faded look, however. I outlined the edges of the word "big" with black marker and I think it works!


Thanks for stopping by!
 
Card Ingredients:
 
Stamps: Word Play, Fox & Friends (ret.)
Paper: Basic Black, Tempting Turquoise, Chocolate Chip, Whisper White
Ink: Chocolate Chip, Basic Black, Tempting Turquoise marker
Tools: 1-3/4" circle punch, Cupcake Builder punch
Accessories: Early Espresso Bakers Twine

Monday, 18 February 2013

So Worth the Wait

It was another fresh February day in PG yesterday! Took Keta for a walk down the forest service road near our neighbourhood - she loves to run freely! Was good for her to get some exercise and get rid of some energy. I also enjoyed getting some fresh air!


Today's card is created using a new sketch from Retro Sketches and a theme challenge from the Paper Players:


This sketch was a bit challenging at first glance, but pairing it with a theme like the one from Paper Players inspired me! Baby cards are always fun to make and I love adding buttons and bows to my cards! This is what I came up with:
 
 
I created a square 5"x5" card. I used designer paper from the Twitterpated DSP collection for the background. A piggy is stamped in Rose Red and popped up on a circle/scallop circle. Small Blushing Bride buttons are added as embellishments and I tied a small bow with Bakers twine for the piggy's ear. The sentiment "so worth the wait" completes the card. Doesn't it make an adorable card for welcoming a new baby girl? 


I created a matching envelope using the Twitterpated DSP.
 
Card Ingredients:
 
Stamps: Button Buddies, Word Play
Paper: Chocolate Chip, Blushing Bride, Whisper White, Twitterpated DSP
Ink: Chocolate Chip, Rose Red
Tools: Circle nestabilities, Scallop Circle nestabilities
Accessories: Twitterpated buttons (Blushing Bride), Early Espresso striped baker's twine
 
Thanks for stopping by!


Saturday, 9 February 2013

A Card Sketches Book and a Feathered Top Hat

Good morning!

It's the start of what's going to be a productive long weekend! That's my goal anyway :) I hope to complete a few custom orders, do some housecleaning, create a budget, do some baking, and more road trip researching! It's ambitious, but doable! In between my tasks on my to-do list, I want to enjoy the sunny mild winter weather that's forecasted for this weekend and catch up on a couple TV shows. Should be a great weekend!

When it comes to designing a greeting card, I often have to plan ahead on the layout, and decide on what colours, stamps, and accessories I'm going to use. I like to have a visual before I sit at my crafting table, so I sketch my ideas on paper. It started with drawing on notepads at work....

But these would end up scattered over my small workspace, making my desk look so cluttered! So, I thought of a solution... I went to my favourite crafting store - Michael's - and checked out the sketchbook aisle. They happened to have a sale that day - buy one, get one for 1 cent. Perfect! I found two small sketchbooks -- the perfect "purse-size". I decorated the front cover and voila!
 
Now all my sketches will be in one place!


I'm excited for this week's challenge!
The inspiration photo comes from a local Prince George artist. At the craft fairs that I participated in last fall, I met quite a few talented vendors, one of them being Amanda Jean of "Orange U CreativE". She is such a sweet and super-talented lady! She makes feathered creations from earrings to necklaces to head pieces. All of her stuff is so gorgeous! I purchased a few pairs of earrings from her and absolutely LOVE them!  (Check out her facebook page: Orange U CreativE) One of her unique items became the inspirational photo that I chose for this week's "Inspired By..." challenge:
 
 
This is a mini top hat to be used as a head piece. It is so unique! I love how it is all pieced together. I see elegance and 'wedding' when I see this photo. I sketched out an idea in my handy dandy sketchbook...
 
 
I thought of using a new technique that I hadn't tried yet. It's called the Starburst Technique. The stripes on the top hat made me think of this. I had seen a few samples on pinterest and have been meaning to try it! I will show you the step-by-step instructions. It's very simple!
 
1) Cut a piece of cardstock 4" x 5.25". It doesn't matter what colour - it will be covered up. I chose to use white.
 
2) Cut three pieces of patterned designer paper into strips of 1.5" x 4.5". (It can be three different patterns, or just two. I decided on two patterned papers for this card). Then cut each of these strips corner to corner so you end up with six triangles.


3) I sponged each triangle piece with Basic Gray to give it a softer, antique look. Arrange the triangles on the cardstock so that they slight overlap each other. Don't glue them down until you are happy with it. It should look something like this:
 
 
4) Trim around the base of the cardstock to clean up the edges:


5) Finish it off by adding a strip of cardstock on the bottom. It can be any colour that you like. In my case, I'm going to glue on a strip of Basic Black cardstock:
 
 
And there you have it! Simple, right?
 
Here's my completed card:
 
 
I scrunched up Cherry Cobbler seam-binding ribbon to tie it all together. The sentiment "happy I do day" is stamped with VersaMark and heat embossed with pewter embossing powder. I made paper feathers and added hearts and rhinestones to complete the card.
 
 
I may have tweeked my sketch a little bit as I was making the card, but I love the final product!
 
Make sure to stop by Karly's Creations to see how this photo inspired her!
 
Card Ingredients:
 
Stamps: Word Play
Paper: Basic Gray, Basic Black, Whisper White, Cherry Cobbler, Neutrals Collection DSP
Ink: VersaMark
Tools: Labels Framelits, Heart to Heart punch, Heat tool
Accessories: Pewter Embossing Powder, Rhinestones, Cherry Cobbler seam-binding ribbon
 
Thanks for visiting!