Thursday, 31 October 2013

Pumpkin Carvings and Birthday Wishes

While Halloween isn't my most favourite holiday of the year (it was more fun as a kid!), I still love getting in the spirit by carving pumpkins! Each year I try to do something different and unique. Here is a series of pumpkin carving pictures from the past couple years:

My hubby's masterpiece, Halloween 2011
 
My pumpkin carving, Halloween 2011
 
Halloween 2012 (mine is the maple leaf)
 
And finally, my latest carving:


Hope you all have a safe and Happy Halloween! I look forward to seeing all the kids in their costumes tonight!
 
--------------------------------------------------------------------------------------------------
 
On another note, it is my niece's 3rd birthday today!
 
I pulled out one of my older designs (and one of my favourites!) and thought it would be perfect for sweet Janna:
 
 
This cute little deer comes from a retired Stampin Up set called Forest Friends (one of my favourites). I paired it with wildflower designer paper and added a paper flower with a brad in the center, sponging the edges with Rose Red ink. I thought the sentiment was a perfect choice to go along with the deer. Did you notice the play on words? :)


Here's wishing Janna a fun day filled with sunshine, laughter, hugs and kisses! 

Card Ingredients:
Stamps: Forest Friends (ret.), Happiest Birthday Wishes
Paper: Pink Pirouette, Chocolate Chip, Whisper White, Always Artichoke, flower DSP (Michael's)
Ink: Chocolate Chip, Rose Red
Tools: Circles Nestabilities, Scallop Trim Border Punch
Accessories: Paper flower, brad, rhinestones

Wednesday, 30 October 2013

Birthday Wishes for Mo!

Today, birthday wishes go out to my goofy, sweet, handsome nephew, Moses!

 
This is a younger picture of Moses - doesn't he have the sweetest smile?!
He has grown up quite a bit since this picture was taken. I look forward to seeing him again this Christmas!

Because he loves cars and trucks so much, I thought it would be fun to make him a card with a race car on it!

 
I fussy-cut the race car and popped it up using dimensionals. I love how the red polka dot designer paper brightens up the card and makes the sentiment and race car stand out.


Here's wishing Moses the best day!
 
Card Ingredients:
Stamps: Fast and Furious (CTMH)
Paper: Night of Navy, Smokey Slate, Basic Gray, Whisper White, Polka Dot Parade DSP
Ink: Black Staz-On
Tools: Circles nestabilities

Tuesday, 29 October 2013

Halloween Themed Challenge - Card #2

Halloween cards are so fun to make! I'm entering another card in the Simon Says Stamp Wednesday Challenge:

HALLOWEEN  or HALLOWEEN COLOURS
 
 
I used layers of designer paper from the 'Witches Brew 'collection to create the card front. The Trick or Treat stamped image is popped up and bordered with a Decorative Label. Candy dots embellish the card (my new favourite embellishment!)


Thanks for stopping by!
 
Card Ingredients:
Stamps: Trick or Treat (Michael's)
Paper: Pumpkin Pie, Very Vanilla, Basic Black, Witches Brew DSP
Ink: Staz-On Black
Tools: Decorative Label punch
Accessories: Pumpkin Pie candy dots


Monday, 28 October 2013

Halloween Themed Challenge - Card #1

It was nice to have a relaxing weekend after a fun, crazy busy week! After getting the house cleaned up and organized last Monday, we had an unexpected visit from family for a few days! Our brother & sister-in-law and their two kids thought they would take a detour up to Prince George. It was so good to see them! We had a great time - short, but sweet :) My hubby and I then went on a date night to see Great Big Sea in concert! What an awesome show it was!
I then took advantage of this past weekend to catch up on some much needed sleep and get my craft on! (only two weeks till the next craft fair!)

Since Halloween is quickly approaching, I thought I would play along with the Simon Says Stamp Wednesday Challenge:
 
HALLOWEEN  or HALLOWEEN COLOURS
 

For this card, I pulled out my favourite Halloween stamp set -- Googly Ghouls (can't get enough of these cute characters!). I love using Pumpkin Pie and Basic Black for Halloween and was happy to see that this orange was in the new "Witches Brew" DSP from Stampin Up!


Black striped ribbon wraps around the card front. The mummy and sentiment are cut out free-hand and popped up to give the card some dimension. I added googly eyes to both characters to complete the card.


Thanks for stopping by! I hope to share another Halloween card tomorrow!
 
Card Ingredients:
Stamps: Googly Ghouls, Teeny Tiny Wishes
Paper: Pumpkin Pie, Basic Black, Very Vanilla, Witches Brew DSP
Ink: Staz-On Black
Tools: Circles Nestabilities, Scallop Circles Nestabilities
Accessories: Black Grosgrain Ribbon, googly eyes

Monday, 21 October 2013

Craft Fair Highlights and Birthday Wishes for an X-box Lover

What a weekend! It definitely flew by! I had a booth at the local Artisans of the North Fair at the University of Northern BC for the weekend and it was a blast! My booth was all set up in the nick of time Saturday morning and swarms of people dropped by off and on throughout the weekend. I'm so grateful for all those who took interest in my paper creations!  It was a great success and I look forward to the next one! (Only three weeks to prepare!)

Here is a picture of my booth:


---------------------------------------------------------------------------------------------------------------
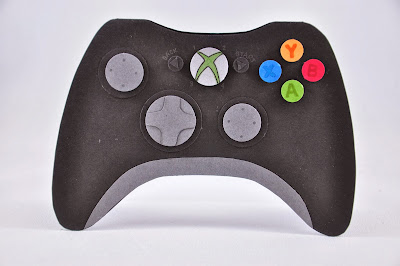
On another note, today is my brother-in-law's birthday! Each year I try to think of something unique for each family member's birthday, something related to their interests/hobbies or professions. Well, this particular brother loves to play X-box. I honestly have never met someone who loves it that much! So, to go along with his interest of video games, I thought it would be fun to make a card in the shape of a controller. I found a template for the base of the card online (unfortunately, I can't find the original blog post), but modified it slightly. I had my hubby's controller in front of me to try and make the card resemble the controller as closely as possible. Here's how it turned out:

The controller:

 
And the card:


I think it turned out quite well! I popped up each circle to resemble the buttons on the controller and used markers for the letters and x-box symbol.
 
Here's wishing Jonathan a very Happy Birthday!

Monday, 14 October 2013

Gobble-Gobble

Happy Thanksgiving to all my Canadian readers out there! Hope you are enjoying this beautiful weekend! Here in northern BC, it has been beautiful and sunny! Yesterday we took a hike through "Forests for the World", a local park. The fall colours were bright and there was not a cloud in the sky!


Today I'm going to share a Thanksgiving card that I made last year, using punch art. I got inspiration from a post I found on Pinterest (can't seem to find the post, unfortunately) and created my own version of a comical turkey!

 
The feathers are punched in Cajun Craze, More Mustard and Real red using a Small Oval punch. The head is also punched with a Small Oval as well, and the body is the 1-3/4" Circle punch. Scallop Circles are used for the front wings. The beak is a petal from the Five-Petal Flower punch and for the wattle I used the small heart from the Heart to Heart punch. The feet are the Word Window punch cut in half.
 
 
It's a bit tedious to put together, but I love the end result!

Enjoy your Thanksgiving celebrations today! I am missing family in Ontario, but I'm so thankful I can spend it with my husband, Kevin, and dog, Keta! We are having a nice quiet weekend together! At this time of year, I am reminded to give thanks for all the countless blessings God has given us! I think of this verse and even though we may want different circumstances at this point in our lives, we need to be thankful for what God has provided for us:
 
 
Card Ingredients:
Stamps: Teeny Tiny Wishes
Paper: More Mustard, Early Espresso, Chocolate Chip, Cajun Craze, Real Red, Daffodil Delight, Whisper White, Basic Black, Orchard Harvest DSP
Ink: Early Espresso
Tools: Scallop Circle punch, 1-3/4" Circle punch, Small Oval punch, Word Window punch, 1/2" Circle punch, 1-hole punch, Five Petal Flower punch, Heart to Heart punch, Modern Label punch, Circles Nestabilities

Saturday, 12 October 2013

Mojo314: A Christmas Card

I've been eager to post my Mojo Monday card (I made it earlier this week). It is contest week and I just had to play along! Here is the sketch:


I've been wanting to get an early start on my Christmas cards and I thought this was a great opportunity! I pulled out my new favourite Christmas designer paper - Winter Frost - and used it as inspiration for the colour combo. Here's the end result:

 
I love how these shades of blue/teal coordinate together! The snowflake embossed cardstock and a punched out snowflake with a rhinestone makes for a perfect wintery Christmas card!


Thanks for looking! I hope this inspires you to get an early start on your Christmas cards!
 
Card Ingredients:
Stamps: Chock Full of Cheer
Paper: Island Indigo, Whisper White, Pool Party, Bermuday Bay, Winter Frost Specialty DSP
Ink: Bermuda Bay
Tools: Circles Nestabilities, Snow Burst Embossing Folder, Snowflake punch
Accessories: Coastal Cabana Stretch Ruffle Trim, Rhinestone

Friday, 11 October 2013

Inspired By... Shades of Pink!

Not only is it the Friday before the long weekend, but it is also the day we introduce a new "Inspired By..." challenge! 


Today's Inspired By... photo was chosen by Karly - a creative photo found on Pinterest:


I love the monochromatic pinks in this photo. I decided to use that as the inspiration for my card. I chose an older sketch from "Seize the Sketch" (a new sketch challenge blog that has become one of my favourite go-to's for inspiration).


I love the hexagon shape trend that I've seen in papercraft projects lately and wanted to give it a try for myself. Here's how it all came together:


I stamped the hexagons in shades of darker pink to lighter pink. Each hexagon is cut free-hand, but I just recently ordered the new hexagon punch from Stampin Up which will make this so much easier! Strips of Raspberry Ripple cardstock are placed on top of the hexagon design. I then added a birthday sentiment and embellished the card with small embossed butterflies, a flower and rhinestone. I love the end result - this has become one of my favourite designs! I may try this one a few times using different colour combos. 

Thanks for stopping by! Feel free to play along! Post a link to your blog below - I'd love to see what you create! 

And don't forget to head on over to Karly's Creations to see how this photo inspired her!

Card Ingredients:
Stamps: Honeycomb (CTMH), Loved Ones
Paper: Crumb Cake, Whisper White, Raspberry Ripple, Pink Pirouette
Ink: Raspberry Ripple, Rose Red, Regal Rose, Pink Pirouette
Tools: Beautiful Wings Embosslit Die, Itty Bitty Shapes flower punch
Accessories: Rhinestone

Thursday, 10 October 2013

KCRR #30 - Happy Birthday Cupcake!

Last night I started another session of Zumba. It has been a while since I've had a good workout! One thing the instructor told us is that "there are no mistakes in Zumba, just unexpected solos" :) I thought this was quite funny, because I'm sure I'm one of those unexpected solos in some of the routines! In any case, it's still a lot of fun!

We introduce a new KCRR challenge today!


The items that were randomly chosen are:

Patterned Occasions Stamp Set
Pumpkin Pie
Pool Party

Patterned Occasions is a stamp set I use quite often, however I tend to use only one or two of the stamps in the set. This time I used the cupcake and made a colourful birthday card using the sketch from The Sweet Stop challenge this week.


A sketch with lots of layers - I like it! I chose Island Indigo and Daffodil Delight to go with the Pumpkin Pie and Pool Party colours. It makes for a fun colour combo, I think!


Thanks for stopping by! Hop on over to Karly's Creations to see how she used these elements in her card!

Card Ingredients:
Stamps: Patterned Occasions
Paper: Island Indigo, Pumpkin Pie, Pool Party, Daffodil Delight, Whisper White, Polka Dot Parade DSP
Ink: Island Indigot
Tools: Circles Nestabilities, Scallop Border punch, Perfect Polka Dots embossing folder

Monday, 7 October 2013

Googly Ghouls Halloween Card

It has been a gloomy weekend here in Prince George. But a rainy weekend is the perfect excuse to stay indoors and craft! With "World Cardmaking Day" on Saturday, I was determined to complete several cards to add to my stock. And I did just that! I had quite the productive weekend. Let's just hope this motivation continues this coming week. With 2 weeks left till my first craft fair of the season, I'm starting to feel the pressure!

One holiday I love making cards for is Halloween. Even though I don't generally send out cards for Halloween, Stampin Up has the cutest Halloween stamp set, called Googly Ghouls and I love making cards using these cute characters!

For todays post, I'm playing along with The Paper Players - a Halloween theme. I chose an older Mojo Monday sketch, pulled out the Howlstooth and Scaringbone designer paper and designed this fun card:


I love how these patterns coordinate so well together and the layout is full of layers - my kind of layout! I added googly eyes to the characters as an added embellishment. The 'ticket sentiment' completes the Halloween theme.


Thanks for looking!

Card Ingredients:
Stamps: Googly Ghouls, That's the Ticket
Paper: Basic Gray, Basic Black, Very Vanilla, Tangerine Tango, Howlstooth and Scaringbone DSP
Ink: Black Staz-On
Tools: Circles Nestabilities, Ticket Duo Builder punch
Accessories: Googly eyes


Friday, 4 October 2013

Inspired By... David's Tea!

I have always been a tea drinker, and recently this past year I was introduced to David's Tea. If you are not familiar with it, they have so many wonderful flavours of loose tea - anything you can think of! Some of my favourites are Forever Nuts, The Glow, and most recently Pumpkin Spice! So delicious!

For this week's "Inspired By..." challenge, it was my turn to choose the inspirational photo. David's Tea posted a fabulous picture for their fall collection and I thought it would be perfect for the Autumn season!


I love the colour combo in this photo! I chose to use Midnight Muse, Pumpkin Pie, Early Espresso, Daffodil Delight and Smokey Slate. I also like the pattern of leaves on one of the mugs and decided to incorporate that in my card. Here's what I came up with:

 
In addition to using the colours and leaves from the photo, I also added some texture -- woodgrain and chevron embossed patterns. I then embellished the card with Daffodil Delight stitched ribbon. 
 
 
Thanks for looking! Drop by Karly's Creations to see how this photo inspired her!

Card Ingredients:
Stamps: French Foliage, Short & Sweet (ret.)
Paper: Smokey Slate, Early Espresso, Whisper White, Midnight Muse, Pumpkin Pie, Daffodil Delight
Ink: Pumpkin Pie, Midnight Muse, Smokey Slate, Daffodil Delight
Tools: Woodgrain Embossing Folder, Chevron Embossing Folder, Scallop Border Punch
Accessories: Daffodil Delight stitched ribbon